
This section describes the add-on system from the perspective of a developer. The implementation of the add-on system is located in the maven module with the group Id org.openecard and the artifact Id addon. All classes are in a sub namespace of org.openecard.addon. The module is divided into the following five packages:
On this wiki page you'll find detailed information about the add-on development like the different kinds of add-ons and how they are enabled to communicate with core application.
Add-on is the generic term for a component that enhances the functionality of the Open eCard App.
Extensions are independent from the context. Moreover, they are included directly into the user interface and can be executed by the user. For instance, an add-on that provides a PIN change functionality for smart cards is classified as an extension.
Plug-ins depend on the context in which the user uses the application. Performing an authentication to a service using a particular smart card, for instance, requires a plug-in which is capable of providing such functionality. Subsequently, plug-ins require a communication with bindings to interact with external applications and services. Furthermore, we distinguish between IFD, SAL, and application plug-ins.
An IFD Plug-in represents a protocol which is used to extend the IFD. The protocol implementation may enable the IFD to perform a special user authentication method or establish a secure channel between a card and card reader to protect the communication from being eavesdropped. Each protocol must have a unique identifier in form of a URI. In addition, each protocol plug-in must implement the IFD Protocol Interface and must define protocol-specific AuthenticationProtocolData used in the EstablishChannel call and corresponding response message. An example for an IFD Plugin is the Password Authenticated Connection Establishment (PACE) protocol which is executed by the IFD. It is included as integrated add-on in the Open eCard App.
The SAL provides generic interfaces to common smart card services like Crypto services or differential identity services. The SAL can be extended by plug-ins, which provide implementations of protocols for the Crypto Services and the Differential Identity Services as required for the use of specific signature cards and electronic identity cards for example. The plugin concept is quite similar to the one used for the IFD. There is also an unique identifier necessary in the protocol implementation but an SAL protocol may have multiple steps and allows the definition more sophisticated user interfaces including a sequence of interaction steps to represent information dialogues and general user consents. For example the already included Extended Access Control (EAC) protocol is one of this kind. The protocol is used while authentication process with German eID card.
Application plug-ins provide a mechanism to add additional functionality to the eID application with which external applications can communicate. Depending on the type of the underlying binding, this could be a browser, a PKCS#11 module or even a remote application. Protocol bindings realize the connection to the external world. While a broad variety of transport protocols could be supported, the most obvious choices are HTTP and SOAP,
as they are stipulated by for example. Given the properties of the activation mechanism, HTTP and SOAP, as well as similar transport protocols, the abstract requirements for a protocol binding are given as follows: A protocol binding must support
Extensions enhance – similar to plug-ins – the basic eID platform and provide additional functionality, but they do not depend on the context in which the eID application is used. Further, extensions are included into the user interface and can be started directly by the user. Similar to application plug-ins, the AppExtensionAction interface contains an execute function. However, this function does not have any parameters nor does it have a result. Therefore, it cannot be used with a binding and only be triggered manually.
An Add-on package is an Java archive (JAR) file which bundles all requires resources like libraries etc. The recognition in the base application is done with via an add-on manifest file located in the META-INF directory. The manifest file has to have the name addon.xml else the archive is not recognized as add-on. This file describes the data model of the add-on you'll find it below. The data model is an XML structure containing general information such as the name, the textual description and configuration entries for changeable settings of the add-on. Furthermore actions are contained which represent the different add-on types from above. The settings are stored in an add-on specific directory and are loaded as Java Properties by the ad-on framework.
This section shows all possible entries for an add-on manifest file and explain there meaning. The manifest is more or less divided into two parts the first one states the general information about the add-on and the second one contains the description of the add-on classes and configuration. So lets start with the general information section.
<?xml version="1.0" encoding="UTF-8" standalone="yes"?>
<AddonSpecification>
    <ID>123</ID>
    <Version>1.0-SNAPSHOT</Version>
    <License>WTFPL</License>
    <LicenseText xml:lang="EN">
        <![CDATA[<center><b>DO WHAT THE FUCK YOU WANT TO PUBLIC LICENSE</b>
        <br><br>
        Version 2, December 2004
        <br><br>
        Copyright (C) 2004 Sam Hocevar <sam@hocevar.net>
        </center>
        <br><br>
        Everyone is permitted to copy and distribute verbatim or modified
        copies of this license document, and changing it is allowed as long
        as the name is changed.
        <br><br>
        DO WHAT THE FUCK YOU WANT TO PUBLIC LICENSE
        TERMS AND CONDITIONS FOR COPYING, DISTRIBUTION AND MODIFICATION
        <br><br>
        0. You just DO WHAT THE FUCK YOU WANT TO.]]>
    </LicenseText>
    <LocalizedName xml:lang="DE">DummyAddon</LocalizedName>
    <LocalizedName xml:lang="EN">DummyAddon</LocalizedName>
    <LocalizedDescription xml:lang="EN">Dummy addon which prints some text to standard output and log file.</LocalizedDescription>
    <LocalizedDescription xml:lang="DE">Dummy Addon, das nur etwas Text auf der Standardausgabe ausgibt und in die Logdatei schreibt.</LocalizedDescription>
    <About xml:lang="EN">
        <![CDATA[About:

        This plugin is just for testing purpose of the Open eCard Addons about dialog. It follows some dummy text to check formatting and wrapping. Lorem ipsum dolor
        sit amet, consetetur sadipscing elitr, sed diam nonumy eirmod tempor invidunt ut labore et dolore magna aliquyam erat, sed diam voluptua. At vero eos et
        accusam et justo duo dolores et ea rebum.]]>
    </About>
    <Logo>DummyLogo.gif</Logo>
    <ConfigDescription>
        <Entries>
            <EnumListEntry>
                <Key>Animal_key</Key>
                <Value>Dog</Value>
                <Value>Cat</Value>
                <Value>Mouse</Value>
                <Value>Elephant</Value>
                <Value>Donkey</Value>
                <LocalizedName xml:lang="DE">Tier-ConfigurationEntry</LocalizedName>
                <LocalizedName xml:lang="EN">Animal configuration entry</LocalizedName>
                <LocalizedDescription xml:lang="DE">Beschreibung des Tier-ConfigurationEntry</LocalizedDescription>
                <LocalizedDescription xml:lang="EN">Description of the animal configuration entry</LocalizedDescription>
            </EnumListEntry>
            <EnumEntry>
                <Key>Kitchen_key</Key>
                <Value>Spoon</Value>
                <Value>Fork</Value>
                <Value>Knife</Value>
                <Value>Cup</Value>
                <Value>Mug</Value>
                <LocalizedName xml:lang="DE">Küchen-ConfigurationEntry</LocalizedName>
                <LocalizedName xml:lang="EN">Kitchen configuration entry</LocalizedName>
                <LocalizedDescription xml:lang="DE">Beschreibung des Küchen-ConfigurationEntry</LocalizedDescription>
                <LocalizedDescription xml:lang="EN">Description of the Kitchen configuation entry</LocalizedDescription>
            </EnumEntry>
        </Entries>
    </ConfigDescription>
    [...]
</AddonSpecification>
As you can see the manifest starts with the <AddonSpecification> tag which covers the complete description. Every add-on requires at least the elements <ID>, <Version>, <License>, <Logo> and a <ConfigDescription> which are explained below.
<ID> |
A unique identifier for the add-on package. |
<Version> |
The version number of the add-on. This number is used to select an add-on in case there are several versions available. |
<License> |
This element is expected to contain the name of the license of the add-on. For instance LGPL Version 3 or Proprietary are such names but in case of a custom or proprietary license you should state the text of the license in the optional element <LicenseText> field. |
<Logo> |
This element states a name of a logo file contained in the add-on package. This logo is displayed in the GUI in case there are configuration options for your add-on. |
<ConfigDescription> |
The element is used to state configuration entries which are used by all parts of the addon. For complete description of the <ConfigDescription> see the next section. If there are no such configuration entries the element may be set to empty witht the element tag <ConfigDescription/>. A detailed description of this element is available here. |
The optional elements of this first section are <LicenseText>, <LocalizedName>, <LocalizedDescription> and <About>.
<About> |
Localized string containing the typical information state in an about dialog. The elements may appear several times for different languages. |
<LicenseText> |
Localized string containing the license text of the add-on. The element may appear several times for different languages. |
<LocalizedDescription> |
Localized string containing a description of the add-on. The element may appear several times for different languages. |
<LocalizedName> |
Localized string containing the name of the add-on. The element may appear several times for different languages. |
Note: The elements <About> and <LicenseText> may contain a CDATA block containing basic HTML code to format the text. This feature heavily depends on the UI implementation. For example the richclient which uses the Swing Framework supports just HTML in version 3.2. Other gui implementations may support higher versions and so more tags.
Now we have the general part of the add-on so let's go on with the second part. The second part contains the descriptions of the available actions which have to appear in the following order <BindingActions>, <ApplicationActions>, <IFDActions> and <SALActions>.
Every *Actions element may contain zero or more elements which describe the actions. An example of the second part is below but note there don't have to be all actions available it's just an example non relevant actions do not have to appear or may be stated as empty.
    <AddonSpecification>
        [...]
        <BindingActions>
            <AppPluginSpecification>
                <ClassName>package.path.to.my.class</ClassName>
                <LoadOnStartup>true</LoadOnStartup>
                <LocalizedName xml:lang="EN">Test class</LocalizedName>
                <LocalizedDescription xml:lang="EN">Test descriptions</LocalizedDescription>
                <ResourceName>/test</ResourceName>
                <ConfigDescription/>
                <Parameters>
                    <Name>Foo</Name>
                    <Value>Bar</Value>
                </Parameters>
                <Body>
                    <MimeType>text/html</MimeType>
                    <Node><![CDATA[<html><head></head><body>test</body></html>]]></Node>
                </Body>
                <Attachments>
                    <MimeType>application/octet-stream</MimeType>
                    <Name>signature.asc</Name>
                </Attachments>
            </AppPluginSpecification>
        </BindingActions>
        <ApplicationActions>
            <AppExtensionSpecification>
                <ID>123</ID>
                <ClassName>org.openecard.addon.openecarddummyaddon.DummyAddonStep</ClassName>
                <LoadOnStartup>true</LoadOnStartup>
                <LocalizedName xml:lang="DE">Test-ExtensionAction</LocalizedName>
                <LocalizedName xml:lang="EN">Test extension action</LocalizedName>
                <LocalizedDescription xml:lang="DE">Testbeschreibung</LocalizedDescription>
                <LocalizedDescription xml:lang="EN">test description</LocalizedDescription>
                <ConfigDescription>
                    <Entries>
                        <EnumEntry>
                            <Key>Foo</Key>
                            <Value>bar</Value>
                            <LocalizedName xml:lang="DE">Test-ConfigurationEntry</LocalizedName>
                            <LocalizedName xml:lang="EN">Test configuration entry</LocalizedName>
                            <LocalizedDescription xml:lang="DE">Testbeschreibung</LocalizedDescription>
                            <LocalizedDescription xml:lang="EN">test description</LocalizedDescription>
                        </EnumEntry>
                    </Entries>
                </ConfigDescription>
            </AppExtensionSpecification>
        </ApplicationActions>
        <IFDActions>
            <ProtocolPluginSpecification>
                <URI>urn:uri:1.2.3</URI>
                <ClassName>package.path.to.protocol.class</ClassName>
                <LoadOnStartup>false</LoadOnStartup>
                <LocalizedName xml:lang="EN">Test Protocol</LocalizedName>
                <LocalizedDescription xml:lang="EN">Description of test protocol</LocalizedDescription>
                <ConfigDescription/>
            </ProtocolPluginSpecification>
        </IFDActions>
        <SALActions/>
    </AddonSpecification>
An entry for the SALActions is omitted in the example because the definition is the same as for the IFDActions both contain ProtocolPluginSpecifications. As you may have noticed there are entries in every specification which are the same. They are discussed following and after that the elements which are unique for a specification are clarified.
<ClassName> |
States the name of the class which implements the the interface specific for the action. The field is required in an valid description. |
<LoadOnStartup> |
States whether the add-on shall be initialized on start of the core application. The element is not required and defaults to false if it is not given. |
<LocalizedName> |
States the name of the action. The elements is optional and may appear several times for different languages. |
<LocalizedDescription> |
Here you may provide an optional description of what the action does. The number of this element is not limited so several languages can be supported. |
<ConfigDescription> |
Description of the configuration options which are changeable by the user. The element is required but it may be empty. A detail discussion about this element is in an extra section here. |
<Parameter> |
This element is just specified and not implemented yet. |
<ResourceName> |
Name of the resource where the action shall be available. The default address of the HTTP Binding is http://localhost:24727/ the resource name needs to be relative to this address. E.g. the integrated status add-on is available under http://localhost:24727/getStatus. |
<Body> |
This element is just specified and not implemented yet. |
<Attachment> |
This element is just specified and not implemented yet. |
<ID> |
A unique ID for the action which is used to query the add-on in the registry. The element is required. |
<URI> |
An unique uri which represents the plugin. The selection of the protocol is performed by the evaluation of this element. The element is required. |
The ConfigDescription element used in the actions and in the general description of the add-on represent always configuration options which are changeable by the user. Configuration entries which are not connected with a user decision should be placed into a separate configuration. This means every entry in the ConfigDescription has an representation as an UI element so the support of an entry type depends on the UI implementation. The Swing implementation implements all options the other GUI implementations are currently not complete.
ConfigDescription elements may contain the following entry types: EnumEntry, EnumListEntry, FileEntry, FileListEntry, ScalarEntry and ScalarListEntry. They are mapped to the following UI elements:
| EnumEntry | The localized name is displayed as label (fallback key name) and the values are represented as checkboxes. |
| EnumListEntry | A list with fixed size containing the values. The UI element is an drop down box. |
| FileEntry | A entry which allows the user to select a file. A file selection dialog represents the entry. |
| FileListEntry | Dynamic list of FileEntry's which are displayed as multiple file selection dialogs. |
| ScalarEntry | The representation depends on the type of the scalar. Available types are BOOLEAN, BIGDECIMAL, BIGINTEGER and STRING. The BOOLEAN type is represented by a single checkbox, the BIGDECIMAL and BIGINTEGER are represented by text field with a spin button and the STRING type is displayed as single text field. |
| ScalarListEntry | The element represents a dynamic list of ScalarEntry's restricted to the types BIGDECIMAL, BIGINTEGER and STRING. |
NOTE: Descriptions of the GUI representation is taken from the Swing GUI other GUI implementations may use other objects.
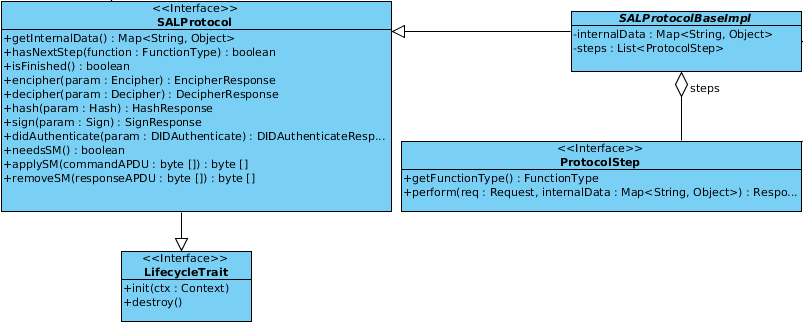
The implementation of an add-on depends always on the type of the add-on but there are also similarities between them. The specific interfaces of the add-ons are explained in the following sections in this section we provide information about the similarities. Every add-on specific interface extends the LifecycleTrait interface which which provides the functions init(Context ctx) and destroy() which mark the beginning and the end of an add-on in their life cycle.. The init(Context ctx) method is call on the initialization and provides access to core components via the Context object. The accessible core components are: AddonManager, AddonProperties, Dispatcher, EventManager, EventHandler, UserConsent, CardRecognition and some other elements for informational use.
| AddonManager | Provides access to the add-on registries and other add-ons. |
| AddonProperies | Provides access to the changeable configuration of the add-on. |
| Dispatcher | Provides access to credentials via SAL and IFD commands. |
| EventManager | Allows to register EventCallbacks this enables an add-on e.g. to react to the insertion of a card. |
| EventHandler | Allows to issue own signals which may be interpreted by other components or add-ons. For instance an add-on which is able to identify a card which is not know by the core and sends a card recognized signal. |
| CardRecognition | Provides access to CardInfo objects and card images. |
| UserConsent | Provides access to the UI. With the UserConsent you are able to just display simple information dialogs or also complex step oriented user interfaces. |
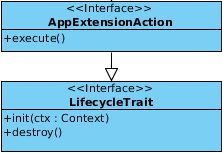
The figure shows the AppExtensionAction interface which have to be implements by in case of an application extension. The implementing party has to implement the init(Context ctx), destroy() methods which are inherited from the LifecycleTrait and execute() method which comes directly from the AppExtensionAction. The extension is included directly into the user interface so the user is able to start it directly from there because the extension does not have any context and is independent it needs to be triggered manually. The execution in the GUI triggers the execute() method which does not have parameters or a return value which means it cannot be used with a binding.
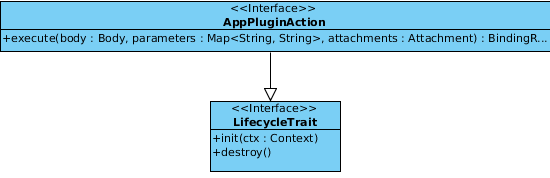
As you can see in the figure the AppPluginAction interfaces execute method takes now three parameters a Body which is represented by a Node which has the advantage that it might be instead of a XML or HTML document also just a string or a number. Furthermore Parameters are given which contain the query parameters of the request sent to the add-on. The last parameter Attachment may contain a binary file or something like that which shall be processed by the add-on. In return to that input the execute method has to issue a _BindingResult_which is able to cover the same object so they are contained in the response which is issued by the corresponding binding but there is more in this object which needs to be specified. The following picture indicates what the others are.
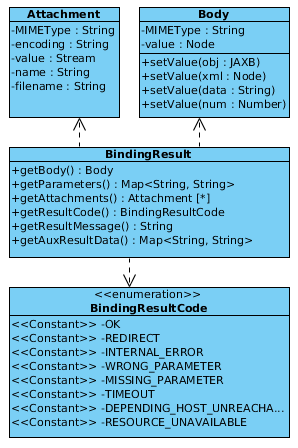
The previously stated elements Attachment, Body and Parameters are optional but the BindingResultCode is required and dependent on the code also the AuxResultData so if the result code is REDIRECT the AuxResultData has to contain the location with the redirect destination. The ResultMessage is also optional but shall be used in case the response is an error response which is directly displayed in the browser. So the user may get an impression what's wrong and correct the input or get in touch with some kind of support.
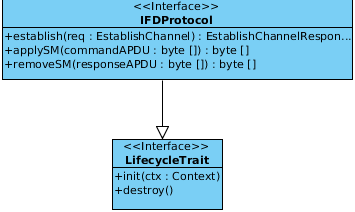
The IFDProtocol interface defines functions for IFD protocols. The establish() method executes the protocol and is triggered by a EstablishChannel IFD API call which is guided to the responsible protocol implementation which takes the request containing a SlotHandle to address a specific card and AuthenticationProtocolData which may be required for the channel establishment. Furthermore the methods applySM(byte[] commandAPDU) and removeSM(byte[] responseAPDU) have to be implemented. They are used to add and remove Secure Messaging to the communication between the card and the terminal.
As depicted in the picture below the SALProtocol interface is probably the most complex available one in the add-on context. The interface covers also the LifecyleTreat methods and also the applySM(byte[] commandAPDU) and removeSM(byte[] responseAPDU) which are known from the IFDProtocol interface. In addition the cryptographic and differential identity functions have to be implemented the functions are:
| cardApplicationStartSession | Starts a session with a specific card. |
| cardApplicationEndSession | Ends a session with a specific card. |
| encipher | Enciphers the data contained in the parameter. |
| decipher | Deciphers the data contained in the parameter. |
| getRandom | Generates a random number according to the specifications in the parameter. |
| hash | Creates a hash from the given data. |
| sign | Signs the given data. |
| verifySignature | Verifies the given signature. |
| verifyCertificate | Verifies the given certificate. |
| didCreate | Creates a new differential identity. |
| didUpdate | Updates an existing differential identity. |
| didDelete | Deletes an existing differential identity. |
| didAuthenticate | Authenticates a differential identity. |
For detailed information about the functions see TR-03112 especially part four and seven.
Now there just the methods getInternalData, isFinished, hasNextStep and_needsSM_ left. They are probably self explaining if not take a look into the class SALProtocolBaseImpl which is an abstract class providing base functionality and provides an easy way to implement step based protocols. The ProtocolStep interface is used for this purpose.
The Open eCard design is inspired by the eCard API Framework specified in BSI-TR03112 which itself relays on the standards CEN15480 and ISO/IEC24727. An overview of this high level design is provided in the following picture:

As the figure depicted the design is covered by multiple modules. This has the advantage that the components are more or less independent and exchangeable for instance the default IFD is implemented for a smart card stack called PC/SC but it might be simply replaced by an implementation for SICCT smart card terminal. Another example is the GUI module the richclient application uses a Swing implementation of the UI and in the Android client there it is replaced by an Android specific UI implementation. Following the main modules are explained.
The GUI is connected via an abstract interface which allow to easily exchange the underlying implementation. The abstract interface is required because an implementation is always specific for a platform for instance the Swing GUI of the Richclient is not usable on Android because the Java implementation of android does not provide the Swing framework. So an abstract description of the user interface was necessary, the abstract components are usable by all components requiring a interaction with the user. The platform dependent user interface implementation has to interpret the abstract components and visualize them. An UML description of the abstract interface is available here.
The IFD provides a message oriented interface according to ISO/IEC 24727-4 which is capable to access ISO/IEC 7816-4 based devices like smart cards. As you can see in the the design picture the IFD contains sub modules which provide additional interfaces for the communication with the devices. The depicted PACE module enables the application to use the PACE protocol which allows secure communication between the device and the terminal accessing the device.
The EventManager is responsible to detect hardware relevant events and propagates them to the rest of the system. Examples for such events are the addition or removal of a card reader or a card. The CardRecognition module of the EventManager is used to identify inserted cards. The recognition module is also extensible so it is easily possible to support a new smart card or device by providing a so called CardInfo file which is an XML file containing a description of the card. The description maps the ISO/IEC 7816 operations to the functions provided by the eCard API Framework.
Similar to the IFD is the SAL a message oriented interface according to ISO/IEC 24727-3. The SAL provides als an extension mechanism, which enables the addition of new authentication protocols without changing major parts of the implementation.
The Dispatcher provides a centralized entry point for the handling of incoming and outgoing messages. This reduces the amount of Java code and the complexity of the Open eCard App.
The Add-on system is an Framework which allows to extend the basic eID platform with different kinds of add-ons. The add-ons are manage by an AddonManager which uses currently two registries to load add-ons. There is a classpath registry which is responsible for loading the packages from the classpath so it just loads the integrated add-ons. For external add-ons there is a file registry which loads the add-on packages from a specific directory. If you would like to know more about the add-on system and development take look at our wiki site about add-ons. The page is here.
Add-ons_interact via _Bindings with applications of service providers. The components implements a transport mechanism like HTTP or SOAP and direct the messages in an abstract form to the add-ons.
The Crypto component encapsulates common cryptographic functions, which are used by other components. It is based on the Bouncy Castle crypto library which makes it easy to port it to platforms without support for the full Java Cryptography Architecture (JCA), such as Android for instance.
The Browser Integration module is just s symbol for applications in general, this is not restricted to just a browser. So every other application may e.g. call the localhost interface to invoke for instance the getStatus control interface to retrieve the current state of the eID client. Also the usage of an PKCS11 module for the browser or other applications which are able to use such modules is possible. More information of the PKCS11 topic are available in on the wiki page here.
The project is written in Java and there are several build tools available. The Open eCard Team has chosen Maven as the way to go. Maven allows to define project with several sub projects/modules this made the process of transforming the abstract modularized design into the projects source code organization. An overview of the currently available modules is provided on the Project Structure page.
The eID client provides currently some interfaces to allows external applications to invoke functions via control interfaces which are accessible via the localhost interface. The following interfaces are available.
| eID Activation | Triggers the authentication with the German eID card or other cards based on TLS authentication. |
| GetStatus | Returns status information about the eID client. |
| WaitForChange | Returns status changes after a previous GetStatus call. |
| ShowUI | Opens specific parts of the user interface. |
Detailed information about the control interface calls are available on a separate wiki page here.
The primary library for cryptography related tasks in the Open eCard App is the Bouncy Castle library which is also used for the TLS connection. The design of the TLS interfaces is depicted in the TLS Design wiki page.
This document defines style rules and formatting advises, so the resulting code is easily readable and understandable. As this project will be open sourced at some point, the code should reflect the discipline of the team and its work.
The key words "MUST", "MUST NOT", "REQUIRED", "SHALL", "SHALL NOT", "SHOULD", "SHOULD NOT", "RECOMMENDED", "MAY", and "OPTIONAL" in this document are to be interpreted as described in RFC 2119.
The indentation style in every applicable source file must use the setting tab-size=8 and indent-size=4. There is however one exception. Imported files such as the eCard XML Schema may be reformatted, but it is not required to do so.
Line endings must be either \r\n for Windows systems and \n for every other system. Git takes care of the proper conversion (see http://stackoverflow.com/questions/3206843/how-line-ending-conversions-work-with-git-core-autocrlf-between-different-operat) only if these characters are used uniformly across a text file. Binary files are not affected by this rule.
One common pitfall is to import XML files containing the wrong or even mixed line endings. Before adding such files to the repository check the line ending and convert it if needed. Sophisticated editors can take care of this task.
Empty lines must only contain the newline character, but no other whitespace characters. Furthermore whitespace between printable characters and the newline character must not be present. Some editors have a feature to indicate these whitespace characters. The formatter should also take care of their removal.
Most newline related rules are explained later in the document.The default file encoding nowadays should be UTF-8. It is often argued that using UTF-16 results in faster text processing. This myth stems from the misconception that UTF-16 is a fixed length encoding, which is not true. In fact only the underlying code table is defined as 2 byte codepage (UCS-2) rather than an 4 byte codepage (UCS-4). Despite its name, UTF-8 is the newer standard.
Besides the UTF file encodings, UNIX systems used to encode in ISO/IEC 8859 or one of its region specific encodings. Windows systems use CP-1252 as default encoding which is an extension to ISO/IEC 8859.
In Java generally everything read with a Reader or written with a Writer is encoded with the default character set defined by the operating system. That also includes XML processors and serializer. It must be made sure that all data is read accordingly by supplying the respective encoding name to the module.
Source as well as resource files, except binary files, must be encoded as UTF-8. When writing a module which processes text, it must be assumed that the input data is UTF-8 if nothing else is specified like a XML Header or a HTTP encoding header.
It is more than good style to name identifiers in code and write documentation, including comments, in English. There is a high possibility that the code will be read and used by foreign language speakers. Furthermore it gives a uniform picture when only a single language is used.
Writing XML documents is pretty straightforward, however a few rules should be followed, so that the files are readable and easily understandable.
<?xml version="1.0" encoding="UTF-8"?><parent><child/></parent><wsdl:definitions xmlns:wsdl="http://schemas.xmlsoap.org/wsdl/"
xmlns:oec="http://ws.openecard.org"
targetNamespace="http://ws.openecard.org"
name="Combined_eCard">
<ShortHand/><ShortHand1/>
<ShortHand2 attr="val" />
<!-- This is the first Group describing XXX -->
<Group1>
    <Child/>
</Group1>
<Group1Second/>
<!-- This is the second Group describing YYY -->
<Group2>
    <Child/>
</Group2>
<MoreSiblingsOrNot/>
The file structure of any Java file (including enums and interfaces) is as shown below. Some elements are optional.
/****************************************************************************
 * Copyright (C) 2012-2014 ecsec GmbH.
 * All rights reserved.
 * Contact: ecsec GmbH (info@ecsec.de)
 *
 * This file is part of the Open eCard App.
 *
 * GNU General Public License Usage
 * This file may be used under the terms of the GNU General Public
 * License version 3.0 as published by the Free Software Foundation
 * and appearing in the file LICENSE.GPL included in the packaging of
 * this file. Please review the following information to ensure the
 * GNU General Public License version 3.0 requirements will be met:
 * http://www.gnu.org/copyleft/gpl.html.
 *
 * Other Usage
 * Alternatively, this file may be used in accordance with the terms
 * and conditions contained in a signed written agreement between
 * you and ecsec GmbH.
 *
 ***************************************************************************/
package org.example.com;
import java.io.File;
import java.io.Inputstream;
import static org.junit.Assert.*;
/**
 * Description of class Foo.
 * @see Bar
 * @author Max Mustermann
 */
public class Foo extends Bar {

}
Putting these elements together results in the file below. Pay attention to the number of newlines between the elements.
/****************************************************************************
 * Copyright (C) 2012-2014 ecsec GmbH.
 * All rights reserved.
 * Contact: ecsec GmbH (info@ecsec.de)
 *
 * This file is part of the Open eCard App.
 *
 * GNU General Public License Usage
 * This file may be used under the terms of the GNU General Public
 * License version 3.0 as published by the Free Software Foundation
 * and appearing in the file LICENSE.GPL included in the packaging of
 * this file. Please review the following information to ensure the
 * GNU General Public License version 3.0 requirements will be met:
 * http://www.gnu.org/copyleft/gpl.html.
 *
 * Other Usage
 * Alternatively, this file may be used in accordance with the terms
 * and conditions contained in a signed written agreement between
 * you and ecsec GmbH.
 *
 ***************************************************************************/
⠀
package org.example.com;
⠀
import java.io.File;
import java.io.Inputstream;
import static org.junit.Assert.*;
⠀
⠀
/**
 * Description of class Foo.
 * @see Bar
 * @author Max Mustermann
 */
public class Foo extends Bar {
⠀
}
This section deals with the rules specific to Java classes. Most rules are also applicable to Enum and Interface types.
public void setFoo(Foo foo) {
    this.foo = foo;
}
public Foo getFoo() {
    return this.foo;
}
The style of commit messages should follow the following rules which are derived from the rules described here.
The Open eCard project is an open source project which depends in several ways on contributions of the community. A contribution may be just a feature request or bug report in the corresponding tracker or to the e-mail address feedback@openecard.org. If you want to be an active member of the development process there is the possibility to contribute bugfixes or even complete new feature in form of source code. You may also become a member of the translator team and translate the software into other languages.
The Open eCard App and the corresponding sources (except the Third Party Libraries, see below) are released under a Dual License. So what are these licenses and how does they influence the contribution process?
There is on one side the General Public License (GPL) in version 3 which grants that all contributions are made public under this license. On the other side the maintaining company (ecsec GmbH) may issue the Open eCard App under other Open Source or proprietary licenses. As laid down in the Open eCard Contribution Agreement the maintaining company is obliged to share the revenues among the contributors. Please refer to the Open eCard Contribution Agreement for more details.
The contribution agreement is an agreement between the contributor and the maintaining company (ecsec GmbH). The agreement ensures that the complete software product may be distributed under appropriate licenses as explained above. A contributor in this sense is an individual or a legal entity which contributes source code or other digital media which is contained in some way in the software.
Following the used third party tools and libraries and their licenses are listed (direct dependencies only):
| Apache Commons (http://commons.apache.org) | Apache License Version 2 |
| Apache HttpComponents (http://hc.apache.org) | Apache License Version 2 |
| Apache Maven (https://maven.apache.org) | Apache License Version 2 |
| Bouncy Castle Crypto API (http://www.bouncycastle.org) | modified MIT License |
| Commons JCI FileAlterationMonitor (https://commons.apache.org/jci/commons-jci-fam) | Apache License Version 2 |
| FindBugs (http://findbugs.sourceforge.net) | LGPL Version 3 |
| Google Android SDK (http://source.android.com) | Android Software Development Kit License Agreement |
| Gson (https://code.google.com/p/google-gson/) | Apache License Version 2 |
| JMockit (http://jmockit.github.io/) | MIT License |
| Logback (http://logback.qos.ch/) | EPL Version 1 or LGPL Version 2.1 |
| Logback-Android (https://github.com/tony19/logback-android) | EPL Version 1 or LGPL Version 2.1 |
| Oxygen (http://www.oxygen-icons.org) | LGPL Version 3 |
| SLF4J (http://www.slf4j.org) | MIT License |
| Seek for Android (https://code.google.com/p/seek-for-android) | Apache License Version 2 |
| TestNG testing framework (http://testng.org) | Apache License Version 2 |
Contributions in form of an addon are not covered by the license of the core system. Every developer is free to select any license appropriate for his needs this may be an open source license or also a commercial/proprietary license.
The Client Control Interface is http based. The webserver of the eCard client is available only under http://localhost:24724.
URLhttp://127.0.0.1:24727/eID-Client
Method
GET
| tcTokenURL | The URL determines where the client can retrieve the TC Token. See TR-03112-7, section 3.2 | Mandatory |
| ifdName | The ifdName determines the card terminal. | Optional1 |
| slotIndex | The slotIndex determines the slot in the terminal. | Optional1 |
| contextHandle | The contextHandle addresses a specific IFD. | Optional1 |
| slotHandle | The slotHandle determines a connected eCard. See TR-03112-6, section 3.2.1. | Optional1 |
| cardType | The cardType determines the type of card which must be selected. | Optional1 |
| 200 OK | The refresh address is comprised in the Message Body (Hack for Mac OS Safari). |
| 303 See Other | The Location field in the response should contain the refresh address. |
| 400 Bad Request | Malformed GET request, e.g. parameters are missing. |
| 500 Internal Server Error | Other errors. |
| 502 Bad Gateway | Server where the TCToken was requested, didn't answer or returned an invalid response. |
| text/html | Webpage with user evaluatable content. E.g. error page, manual redirect, ... |
Description
The interface can be used to start the eID application.
http://bsi.bund.de/cif/npa.xml, and thus the next rule becomes effective.http://openecard.org/cif/soft-credential) are used. In that case no dialog is shown, when there is no certificate. Instead an error is produced.During the processing of the activation, a TCToken is fetched from a remote server.
The TCToken is defined as follows:
<element name="TCToken" type="TCTokenType" />

<complexType name="TCTokenType">
  <sequence>
    <element name="ServerAddress" type="anyURI" />
    <element name="SessionIdentifier" type="string" />
    <element name="RefreshAddress" type="anyURI" />
    <element name="CommunicationErrorAddress" type="anyURI" minOccurs="0" />
    <element name="Binding" type="anyURI" />
    <element name="PathSecurity-Protocol" type="anyURI" minOccurs="0" />
    <element name="PathSecurity-Parameters" minOccurs="0">
      <complexType>
        <choice>
          <element name="PSK" type="hexBinary" />
        </choice>
      </complexType>
    </element>
  </sequence>
</complexType>
urn:liberty:paos:2006-08urn:ietf:rfc:2616urn:ietf:rfc:5246urn:ietf:rfc:4279urn:ietf:rfc:4279.urn:ietf:rfc:5246)urn:ietf:rfc:5246).
URLhttp://127.0.0.1:24727/getStatus
or
http://127.0.0.1:24727/eID-Client
The second URL was made available later to be conform to the newest version of BSI-TR03124.
Method
GET
| session | The session parameter establishes an event queue for further requests with waitforChange. | Optional |
| Status | The Status parameter is restricted to be used with the second URL and indicates that the status is requested from the eID-Client resource. | Mandatory for second URL |
| 200 OK | Status element (see below). |
| 400 Bad Request | Malformed GET request, e.g. session parameter is too weak. |
| 500 Internal Server Error | Errors in the smartcard stack or the webserver. |
<complexType name="StatusType" xmlns:oec="http://ws.openecard.org/schema" targetNamespace="http://ws.openecard.org/schema">
  <sequence>
    <element name="ConnectionHandle" type="iso:ConnectionHandleType" maxOccurs="unbounded" minOccurs="0" />
    <element name="UserAgent"                                        maxOccurs="1"         minOccurs="0">
      <complexType>
        <sequence>
          <element name="Name"            type="string" />
          <element name="VersionMajor"    type="integer" />
          <element name="VersionMinor"    type="integer" maxOccurs="1" minOccurs="0" />
          <element name="VersionSubminor" type="integer" maxOccurs="1" minOccurs="0" />
        </sequence>
      </complexType>
    </element>
    <element name="SupportedAPIVersions" maxOccurs="unbounded" minOccurs="0">
      <complexType>
        <sequence>
          <element name="Name"            type="string" />
          <element name="VersionMajor"    type="integer" />
          <element name="VersionMinor"    type="integer" maxOccurs="1" minOccurs="0"/>
          <element name="VersionSubminor" type="integer" maxOccurs="1" minOccurs="0"/>
        </sequence>
      </complexType>
    </element>
    <element name="SupportedCards" maxOccurs="unbounded" minOccurs="0">
      <complexType>
        <sequence>
          <element name="CardType" type="anyURI" maxOccurs="1" minOccurs="1" />
          <element name="DIDProtocols" type="anyURI" maxOccurs="unbounded" minOccurs="0" />
        </sequence>
      </complexType>
    </element>
    <element name="SupportedDIDProtocols" type="anyURI" maxOccurs="unbounded" minOccurs="0" />
    <element name="AdditionalFeatures"    type="anyURI" maxOccurs="unbounded" minOccurs="0" />
  </sequence>
</complexType>

<element name="Status">
  <complexType>
    <complexContent>
      <extension base="oec:StatusType">
        <sequence />
      </extension>
    </complexContent>
  </complexType>
</element>
http://www.bsi.bund.de/ecard/api, 1, 1, not set| text/xml | The Status element. |
| text/html | Message in case of an error. |
Description
The interface can be used to request information about the eID application and its current state.
URLhttp://127.0.0.1:24727/eID-Client
Method
GET
| ShowUI | The query parameter has to have a module name as value indicating the GUI component to open. | Mandatory |
| 200 OK | The GUI was opened successfully there are no other status codes. |
Content Types
none
Description
The interface opens an GUI component which is specified by the components name in the ShowUI query parameter. The following components are currently accessible:
| PINManagement | Opens the UI for the PIN management |
| Settings | Opens the Settings dialog |
If the parameter ShowUI does not contain a module name or contains a unknown module name the default UI is opened. In case of the Swing GUI this is the About dialog.
URLhttp://127.0.0.1:24727/waitForChange
Method
GET
| session | The session of a previously set up event queue (see GetStatus). | Mandatory |
| 200 OK | StatusChange element (see below). |
| 400 Bad Request | Malformed GET request, e.g. session parameter is too weak. |
| 500 Internal Server Error | Errors in the smartcard stack or the webserver. |
<complexType name="StatusChangeType" xmlns:oec="http://ws.openecard.org/schema" targetNamespace="http://ws.openecard.org/schema">
  <sequence>
    <element name="ConnectionHandle" type="iso:ConnectionHandleType" maxOccurs="1" minOccurs="1" />
    <element name="Action"           type="anyURI"                   maxOccurs="1" minOccurs="1" />
  </sequence>
</complexType>

<element name="StatusChange">
  <complexType>
    <complexContent>
      <extension base="oec:StatusChangeType">
        <sequence />
      </extension>
    </complexContent>
  </complexType>
</element>
The contents of the StatusChange element are defined as follows:
| text/xml | The StatusChange element. |
| text/html | Message in case of an error. |
Description
The interface can be used to request status change information after an initial GetStatus call.
1 Openecard proposal: This parameter/interface is an Open eCard specific extension. It is not part of the official eCard specification.
The high level view of the development is probably best explained by the following picture which includes also the quality management and the community involving processes. It is the ISO 9000 inspired Quality Management System used in the project.

For a better understanding of this development circle it is necessary to know the roles which are setup in the process of development.
The project comprises the following roles:
The Project Manger, Manager, Testers, and Core Developers form the core team which is responsible for development of application core. They may be assisted by developers from the developer community.
So now may want to know how the development process of a new release (minor or major release) is initiated and what's happening in the phases of the development. This will be the subject of the next sections.
On the very beginning there have to be defined what the development goals of a new release are. This includes evaluation of the feasibility of new features and the necessity to fix open bugs also the stability may be subject of decision process. In order to archive the goal definition the feature and bug trackers are considered to get an overview about what the needs of the community are to improve the acceptance and increase the spreading. Furthermore there is the core team which may have ideas they want to implement to simplify the internal structure or module communication or whatever. All the information are gathered by the Project Manager and discussed with the manager. In the end the features to implement and bugs to fix are transformed into tasks which are assigned to specific developers which are than responsible for the realization. Also an release date and a feature freeze date is stated, the feature freeze is around two weeks before the release date.
In this phase the developers implement the features or solve the bugs according to their assigned tasks. Features have to be implemented until the feature freeze date else the feature will be rejected and is part of the next release. After the feature freeze it is just allowed to commit fixes for existing code. While the implementation the developer may commit his work to the development branch if the commit full fills the minimum quality requirements which are:
More commit related rules may be found in the Repository Guidelines. Next to the requirements for the commits there are also requirements regarding to the style of the code. The code styling is described in the code style guide which may be found here.
A person is nominated by the project manager (usually a tester or release manager) who is responsible for supervising the commits of the developers and reject a commit if these rules are not obeyed.
As stated above the development phase lasts until the feature freeze which also is the entry point for the test phase.
During this phase the manager and the tester test the code intensively and report every found bug to the responsible developer. The test include an acceptance test according to BSI-TR03124-2 and several other tests which are defined in the Quality Management section of the Wiki. The release phase is entered just if all problems occurred while testing are solved.
With the tests having been completed, the release manager builds a release version and distributes it to the users. A release version does not mean that the final release is publish also a public beta or so is possible to ensure everything is working correctly because integration tests are mostly executed with test cards which may be different compared to production cards. This is especially necessary if the is support for new cards included into a release. The status of the release may be determined by the version number.
The release versions are numbered in accordance to Semantic Versioning which is basically the following scheme:This is normally the point where the process is restarted for the next major or minor release but there may be also the case that a critical bug what discovered which influences the security or stability of the software which creates the necessity to release a so called bugfix version. A bugfix release includes the same phases as a normal release but it addresses just the specific problem(s) which is/were the reason for the not planed release.
In order to allow distributed and convenient editing using the wiki AND producing documents with high quality typesetting, the document creation process as depicted in the following figure is implemented.

The primary editing is performed in the present Wiki, which uses the Textile markup as explained here.
In order to allow an automated conversion to and processing with LaTeX, the following issues MUST be considered:
The export of the Textile source to an appropriate .tex file and the provision of embedded pictures MAY be performed manually.
In the long turn there SHOULD be an automated export of the Wiki-pages as explained here for example.
The Textile-markup from the Wiki can be converted to LaTeX using RedCloth.
In order to support references to documents (e.g. [BSI-TR-03112-7]), intra-Wiki-Links and the inclusion of pretty-printed XML- or Java-code, the raw LaTeX document needs to be cleaned up with awk for example.
This includes the following replacements:
1. <pre><code class="XXX"> --> \begin{minted}[bgcolor=bg]{XXX}
2. </code></pre>           --> \end{minted}
3. "[LABEL]":http://url    --> \cite{LABEL}
4. [[WikiRef]]             --> Inserting canonical labels {file+headline} and converting Intra-Wiki-links to \ref{ }
Finally the LaTeX sources are compiled to produce a nice pdf-document for example.
TODO
In dem Änderungsprotokoll des CardInfo Treffen am 29.6.2011 wird der Eintrag für Protokolle (iso:SlotCapability/iso:Protocol) wie folgt ergänzt:
In dem WertSupport of the IFD for PACE according to [TR-03119] is indicated by the URI
urn:oid:0.4.0.127.0.7.2.2.4.xx, wherexxis the decimal representation of the capabilities bitmap returned byGetReaderPACECapabilitiesas defined in [TR-03119].
xx sind folgende Werte der unterstützten PACE Ausprägungen codiert:
Statt für einen Leser, der eID und QES beherrscht, 48 (0x30) in die URI einzusetzen, sollten 2 URIs mit jeweils 16 (0x10) und 32 (0x20) gesendet werden.
Mit JAXB als am weiten verbreitendem Werkzeug für Objekt-XML Mapping, sollte es das Ziel der Spezifikation sein möglichst keine Fehler hierin zu erzeugen.
Offensichtlich hat JAXB (stand Bundle in Java Version 7) Probleme bei der Umwandlung von AnyType mit einem Restriction element.
(Adresse der Anwendung: http://willow.mtg.de/eidavs/static/index.html)
Neue Adresse der Anwendung: https://willow.mtg.de/eid-server-demo-app/index.html
Adresse eID-Server: https://fry.mtg.de:443
In AuthenticationProtocolData der DIDAuthenticate-PAOS-Nachrichten für EAC fehlt die Protocol-URI.
Server verlangt in dem ConnectionHandle ein SlotHandle. Fehler "SlotHandle is not set". Log File siehe hier
Kein TLS1.1 oder höher.
Das Element "ServerAddress" ist keine URL.
fry.mtg.de:443
Adresse der Anwendung: https://test.governikus-eid.de/Autent-DemoApplication/
Adresse eID-Server: https://testpaos.governikus-eid.de:443
Abweichungen:
1. Die Protocol-URI in AuthenticationProtocolData der DIDAuthenticate-PAOS-Nachrichten für EAC ist "urn:oid:1.0.24727.3.0.0.7.2", sollte laut TR-03112-7 v1.1.2 Kap. 4.6 aber "urn:oid:1.3.162.15480.3.0.14" sein.
2. In den DIDAuthenticateResponse-Nachrichten muss der Präfix für den Namensraum "urn:iso:std:iso-iec:24727:tech:schema" zwingend "iso" sein. (eventuell Vergleich des xsi:type auf "iso:EAC1InputType")
3. Sender der Client die SNI-Extension im TLS (siehe RFC 4366) verhält sich der Server nicht spezifikationskonform. Laut RFC sind folgende Rückgabewerte zulässig:
a) Ignorieren der Extension wenn unbekannt/nicht unterstützt
b) antworten mit einer "leeren" extension wenn erfolgreich
c) antworten mit "unrecognized_name" wenn servername unbekannt
Der eID-Server antwortet allerdings mit "testpaos.governikus-eid." und sendet bei einer späteren Handshake-Nachricht falsche Daten, wodurch keine Verbindung zustande kommt.
Adresse der Anwendung: https://eid.services.ageto.net/gw/
Adresse eID-Server: https://eid-ref.eid-service.de:443
Abweichungen:
In AuthenticationProtocolData der DIDAuthenticate-PAOS-Nachrichten für EAC fehlt die Protocol-URI.
1. Die eID-Kommunikation läuft auch mit einer nicht-PSK-Ciphersuite (TLS_RSA_WITH_AES_128_CBC_SHA). Log File siehe hier
2. kein TLS1.1 oder höher
StartPAOS muss ein ConnectionHandle enthalten. Es erfolgt keine Fehlermeldung von Server. Siehe TR-03112-7, Kapitel 2.6 StartPAOS.
308202D5060A04007F00070301030101A10E0C0C442D547275737420476D6248A2181316687474703A2F2F7777772E642D74727573742E6E6574A3120C1053594E4348524F4E49545920476D6248A429132768747470733A2F2F7777772E73796E6368726F6E6974792E6E65742F64656D6F706F7274616C2FA58201F20C8201EE4E616D652C20416E7363687269667420756E6420452D4D61696C2D4164726573736520646573204469656E7374616E626965746572733A0D0A53594E4348524F4E49545920476D62480D0A57696E7A65726C616572205374722E20320D0A3037373435204A656E610D0A6E70614073796E6368726F6E6974792E64650D0A0D0A5A7765636B2064657220446174656EEFBFBD6265726D6974746C756E673A0D0A4964656E746966697A696572756E6720756E642052656769737472696572756E67207A756D2070657273EFBFBD6E6C696368656E204B756E64656E6B6F6E746F0D0A0D0A5A757374EFBFBD6E6469676520446174656E73636875747A626568EFBFBD7264653A0D0A5468EFBFBD72696E676572204C616E64657376657277616C74756E6773616D74205265666572617420486F6865697473616E67656C6567656E68656974656E2C20476566616872656E6162776568720D0A5765696D6172706C61747A20340D0A3939343233205765696D61720D0A54656C3A20283033203631292033372037332037322035380D0A4661783A20283033203631292033372037332037332034360D0A706F73747374656C6C6540746C7677612E7468756572696E67656E2E64650D0A416E737072656368706172746E65723A204672617520416E6B65204E65756D616E6E0D0AA7683166042012054BDCDD69F93AFDBC8666B908C386B009821730C96C3C066F8E6A20D0BE0D0420D97D56EB57F16D0510FD77DE1B964D186E69CED9E6E17FBEA7DBB0F5B3A814650420E9B2B7E1430EFDE9E99A25603AD32E2671EFB6B00D921439428DF982CE168D44
Name, Anschrift und E-Mail-Adresse des Dienstanbieters:
SYNCHRONITY GmbH
Winzerlaer Str. 2
07745 Jena
npa@synchronity.de

Zweck der Daten?bermittlung:
Identifizierung und Registrierung zum pers?nlichen Kundenkonto

Zust?ndige Datenschutzbeh?rde:
Th?ringer Landesverwaltungsamt Referat Hoheitsangelegenheiten, Gefahrenabwehr
Weimarplatz 4
99423 Weimar
Tel: (03 61) 37 73 72 58
Fax: (03 61) 37 73 73 46
poststelle@tlvwa.thueringen.de
Ansprechpartner: Frau Anke Neumann
Siehe TR-03110-3, Kapitel A.6.1. Public Key References
Zitat:Note: As a consequence the Certification Authority Reference contained in a certificate MUST be equal to the Certificate Holder Reference in the corresponding certificate of the issuing certification authority.
Ich leite aus der Aussage ab, dass bei CVCA Zertifikat CHR = CAR sein muss.
EAC1Input: Terminal-Zertifikat, DV-Zertifikat, CVCA-Zertifikat (CHR!=CAR)
EAC2Input: DV-Zertifikat
EAC1Input: Terminal-Zertifikat, DV-Zertifikat, CVCA-Zertifikat (CHR!=CAR)
EAC2Input: DV-Zertifikat, Terminal-Zertifikat
EAC1Input: Terminal-Zertifikat, DV-Zertifikat
EAC2Input: DV-Zertifikat, Terminal-Zertifikat
The following table provides an overview of interoperability tests between the
Open eCard App (v1.2 or higher), with differently set legacy switches, and the operational eServices
out there, which are listed within AusweisApp2 (v1.8.0).
| eService | URL | Last checked | Verdict | Remark, Logfile etc. | |
|---|---|---|---|---|---|
| *all activated* | *all deactivated* | ||||
| :::(bit)kasten | https://www.bitkasten.de/ | ||||
| Allianz Kundenportal - Meine Allianz | https://meine.allianz.de | ||||
| Allianz Maklerportal | https://makler.allianz.de | ||||
| Ausweis Auskunft des Bundes | https://www.buergerserviceportal.de/bund/ausweisapp/bspx_selbstauskunft | ||||
| BAföG online | https://www.bafoegonline.bva.bund.de/ | ||||
| Beantragung Schwerbehindertenausweis Saarland | https://gatewaylas.saarland.de/FV/Onlineantrag | ||||
| Bundesagentur für Arbeit | https://www.arbeitsagentur.de/npa | ||||
| Bundestag ePetition | https://epetitionen.bundestag.de/epet/anmelden.html | 2016-12-17 Version 1.2.4 | OK | NOK | Benötigt die Legacy-Option 'CAR als String' ansonsten kommt nur eine Fehlermeldung vom Server "Es gab einen Zugriffsfehler. (2) -- interne Meldung: Internes Konfigurationsproblem Berechtigungs-PKI: Unerwartete Rückmeldung möglicherweise wegen Konfigurationsfehler." |
| Bürgerportal Baden-Württemberg | http://service-bw.de/zfinder-bw-web/welcome.do?showMsbwDetails=1 | ||||
| Bürgerportal Rheinland Pfalz | http://www.rlpdirekt.de/rheinland-pfalz | ||||
| Bürgerservice-Portal Kreis Herford | https://www.buergerserviceportal.nrw/krz/lkrherford | ||||
| Bürgerservice-Portal Kreis Minden-Lübbecke | https://www.buergerserviceportal.nrw/krz/mindenluebbecke | ||||
| Bürgerservice-Portal Stadt Lage | https://www.buergerserviceportal.nrw/krz/lage | ||||
| Bürgerservice-Portal Stadt Norderstedt | https://norderstedt.de/digital | ||||
| Bürgerservice-Portal Wiesbaden | https://www.buergerserviceportal.de/hessen/wiesbaden | ||||
| Bürgerservice-Portale der bayerischen Kommunen | https://www.buergerserviceportal.de/bayern/classic/ | ||||
| CosmosDirekt Kundenportal meinCosmosDirekt | https://www.cosmosdirekt.de/services/mcd-info | 2016-12-15 version 1.2.4 | OK | NOK | (braucht NUR Legacy-Option 'CAR als String') cosmos_all_deactivated.log |
| d.velop – foxdox.de: Dokumente sicher ablegen | https://mein.foxdox.de/ | ||||
| Datev - Arbeitnehmer online / Lohn- und Gehaltsabrechnung | https://www.datev.de/portal/ShowPage.do?pid=ano&nid=159749 | ||||
| Deutsche Rentenversicherung | https://www.eservice-drv.de/OnlineDiensteWeb/init.do?npa=true | 2016-12-16 Version 1.2.4 | OK | NOK | Benötigt die Lepacy-Optionen 'CAR als String' und 'Schwache Crypto Parameter' ansonsten kommt die Fehlermeldung 'Das TCToken konnte nicht empfangen werden' drv_all_deactivated.log |
| DKB-Cash - Onlineantrag Konto und Kreditkarte | http://www.dkb.de/privatkunden/dkb_cash | ||||
| eAntrag der Investitionsbank Berlin (IBB) | http://www.ibb.de/e_antrag.aspx | ||||
| easy Login - Der Zugang für Finanz- & Versicherungsvermittler | http://www.easy-login.de | ||||
| ElsterOnline-Portal | https://www.elsteronline.de | ||||
| Einheitlicher Ansprechpartner Köln | http://www.einheitlicher-ansprechpartner-koeln.de/eaportal/ | ||||
| Feinstaubplakette beantragen | http://www.berlin.de/labo/fahrzeuge/kfz-zulassung/feinstaubplakette/shop.85047.php | ||||
| Führungszeugnis und Auskunft aus dem Gewerbezentralregister | https://www.fuehrungszeugnis.bund.de/ | 2016-12-15 Version 1.2.4 | OK | NOK | Braucht TLS1.0 und CAR als String |
| Halterauskunft zu einem KFZ beantragen | https://www.berlin.de/labo/mobilitaet/kfz-zulassung/halterauskunft/shop.86598.php | ||||
| Hamburg Service Online-Bürgerdienste | https://gateway.hamburg.de/HamburgGateway/FVP/Application/Index.aspx | ||||
| HUK 24 AG - Registrierung für Servicebereich "Meine HUK24" | https://www.huk24.de/ | ||||
| ID-Safe des Landkreis Kitzingen | https://www.buergerservice.org/ID-Safe-Kitzingen | ||||
| ID-Safe des Landkreis Ostallgäu | https://www.sixform.com/ID-safe | ||||
| ID-Safe des Landkreis Würzburg | https://www.buergerservice.org/ID-Safe-Wuerzburg | ||||
| Identitätsprüfungen nach dem Signaturgesetz und dem Geldwäschegesetz | https://www.identity.tm | ||||
| Kraftfahrt-Bundesamt - Auskunft aus dem Verkehrszentralregister | https://www.kba-online.de/faeronline/faeranfrage.do | 2016-12-15 Version 1.2.4 | NOK | OK | Braucht Option 'CAR als String' |
| Login Meine VBL | https://vbl.de/de/meine_vbl | ||||
| LVM Versicherung - Kundenportal Meine LVM | http://www.lvm.de/personalausweis | ||||
| Mentana-Claimsoft AG - Registrierung beim De-Mail Dienst | https://www.fp-demail.de/ | ||||
| OpenPGP-eID | https://pgp.governikus-eid.de/pgp/ | ||||
| Registrierung/Login auf www.tk.de | https://www.tk.de/tk/online-filiale/meine-tk/meine-tk/118032 | 2016-12-14 Version 1.2.4 | OK | NOK | (braucht NUR Legacy-Option 'CAR als String') |
| Schufa – Auskunftsportal „Meine SCHUFA“ | https://www.meineschufa.de/index.php?site=30_2_1_pa#tabNPA | ||||
| Service-Portal "Auto" Kreis Lippe | https://www.buergerserviceportal.nrw/krz/lkrlippe | ||||
| sign-me (Bundesdruckerei) | https://live.esign-service.de/esign/start | ||||
| Single-Sign-On-Dienst auf Basis von OpenID | https://openid.internet-sicherheit.de | ||||
| SkIDentity Service | https://skidentity.de/service | ||||
| Stadt Nürnberg: Online-Bürgerdienste Service | http://www.nuernberg.de/internet/onlinedienste | ||||
| Standesamt Online Mecklenburg-Vorpommern | https://portal.ego-mv.de/ | ||||
| Telekom DeMail für Privat- und Geschäftskunden | https://www.telekom.de/de-mail | ||||
| T-Systems DeMail für Großkunden | https://www.t-systems.de/de-mail | ||||
| Urkundenservice Köln | http://www.stadt-koeln.de/service/produkt/urkundenservice-des-standesamtes | ||||
This guide will give you a short briefing of how to get your development environment up and running within a few minutes.
For the basic setup of your development environment you need to obtain the following tools and programs:
Since the setup process of the development environment is dependent on the operating system used, you will find the instructions for different systems (Windows, OS X and Linux) below.
You are done!
You are done!
On Linux you can use your system's package manager to install all required tools and programs. Below you will find the commands to do so, based on aptitude, a front-end for Debian's Advanced Package Tool (APT).
sudo aptitude install openjdk-7-jdksudo aptitude install openjdk-8-jdksudo aptitude install emacssudo aptitude install netbeanssudo aptitude install eclipsesudo aptitude install mavensudo aptitude install gitYou are done!
In order to get started with the development we need the code to work with. The public repository with the source code is located at https://github.com/ecsec/open-ecard which needs to be cloned. How to clone a repository depends on the git integration in the used IDE or editor. The general process on the command line is as follows and should be the same on all platforms.
git clone https://github.com/ecsec/open-ecard.gitcd open-ecardgit submodule update --initYou may now open the project in your preferred IDE or editor and start developing but be sure to have read the necessary documents regarding the development and contributions to the project.
This section contains a collection of links to topics which are also relevant for the development process.
This first section is intended to provide information how internationalization is managed in the Open eCard App. If you are a translator willing to contribute an translation see here.
All translation files must be located below the folder openecard_i18n plus a component name. The special file Messages.properties is used to provide translated key value pairs. Completely translated files can have any other name. All files must be encoded as UTF-8.
All translation files follow the same scheme to identify their language. The language is written in the form of BCP 47 language tags. However instead of -, _ is used as a separator, which is the common practice. This implementation only supports a subset of the BCP 47 specification, meaning only language and country codes are allowed. The default language, which is English is described by C. The name of the file and its language is separated by _. The file ending is optional for arbitrary files.
The following examples illustrate the scheme.
Messages_C.properties
Messages_de.properties
Messages_de_DE.properties
anyotherfile_C
anyotherfile_C.html
The implementation tries to find the key in the requested language, then the default language and if nothing is specified at all, a special string in the form of <No translation for key <requested.key>> is returned. The most specific translation is used first as the following list shows.
openecard_i18n/gui/about_de_DE.html
openecard_i18n/gui/about_de.html
openecard_i18n/gui/about_C.html
The Netbeans property editor does not write UTF-8 encoded files, but instead ASCII files with Unicode escape sequences. Until a workaround is provided or the issue is fixed, please use another UTF-8 capable editor. In practice that means any editor except Netbeans.
The Open eCard Project uses the translation service of Transifex which is an online tool for translations. If you want to contribute a translation for your language, sign up or login on Transifex and request member ship for your language on the Open eCard Project page there. As soon as your are accepted you may start with the translation process.
The usage of the online service has the advantages that you don't have to care about file format and encoding. The translation process is done with the online editor and you may easily save the translation there and it is integrated afterwards, no need to send them via e-mail or commit it into the git repository.
No dependency SHOULD be added to the module POM. The slf4j dependency is already defined in the ecard client root POM.
slf4j needs a backend implementation. For the tests, logback-classic is pulled in by the root POM. For production use, the client artifact must pull in a compile dependency on a backend and configure it appropriately.
import org.slf4j.Logger;
import org.slf4j.LoggerFactory;

private static final Logger logger = LoggerFactory.getLogger(MYCLASS.class);
import org.slf4j.Logger;
import org.slf4j.LoggerFactory;

private static final Logger logger = LoggerFactory.getLogger(MYCLASS.class);

try{
 ...
} catch (Exception e){
  logger.error(ex.getMessage(), ex);
}
try{
 ...
} catch (Exception e){
  logger.error("Error while reading value X.", ex);
}
Messages including APDUs, eCard-API messages, PAOS messages.
import org.slf4j.Logger;
import org.slf4j.LoggerFactory;

private static final Logger logger = LoggerFactory.getLogger(MYCLASS.class);

logger.debug("Message received:\n{}", message);
logger.debug("Message sent:\n{}", message);
E.g. GUI events.
import org.slf4j.Logger;
import org.slf4j.LoggerFactory;

private static final Logger logger = LoggerFactory.getLogger(MYCLASS.class);

logger.debug("Event: {}", event);
public void foo(Bar b) {
    logger.trace("Enter function foo: {}", b);
    ...
mvn release:prepare
mvn release:perform
xcrun altool --notarize-app --primary-bundle-id
"org.openecard.versioncheck.MainLoader" --username "{APPLE_ID_EMAIL}" --
password "{APPLE_APP_SPECIFIC_PASSWORD}" --asc--provider "72RMQ6K75Z" --file
{PKG_OR_DMG_FILE}
xcrun altool --notarization-info "{REQUEST_UUID}" --username
"{APPLE_ID_EMAIL}" --password "{APPLE_APP_SPECIFIC_PASSWORD}"
vim /opt/typo3-test/site/update-list.json
vim /opt/typo3-prod/site/update-list.json
On this wiki page we provide materials relevant for the wiki itself or Open eCard related stuff.
Wiki page to LaTeX: Documentation Strategy
eID-Server issues (old): EID Server Issues
User Guides (old): User Guide
Service Provider for German eID
The Open Mobile API maps javax.smartcardio to the Transport API within the Open Mobile API.
On Android the Secure Element Evaluation Kit (seek) is implementing the Open Mobile API specification with its Smartcard API framework extension (see http://code.google.com/p/seek-for-android/wiki/SmartcardAPI).
To include the Smartcard API framework extension, the android source code has to be patched (see http://code.google.com/p/seek-for-android/wiki/BuildingTheSystem). After that, it can be used by including http://seek-for-android.googlecode.com/files/org.simalliance.openmobileapi.jar as library in the developed application.
This implies that, as long as the Smartcard API framework extension is not part of the official android sources, the developed application will only run on properly patched development devices and is therefore not distributable to end users without further ado.
The main goal of the PKCS#11-interface of the Open eCard App is to provide the functionality, which is required by Mozilla’s Firefox browser.
Mozilla’s overall crypto architecture as taken from [Grif09] is depicted in Figure 1.

Figure 1: Mozilla's Cryptographic Architecture ([Grif09], p. 22)
The important part is the usage of the PKCS#11-interface by the “Core Crypto Code” within the “Network Security Services” as explained in [NSS-PKCS#11].
As this browser is a successor of Netscape’s Communicator it is expected that the PKCS#11-usage in today’s Firefox is similar to the PKCS#11-usage explained in [NSS-PKCS#11].
Among the general-purpose functions defined in Section 11.4 of [NSS-PKCS#11] the following functions need to be supported:
C_InitializeC_FinalizeC_GetFunctionListC_GetInfoC_Initialize
As explained in [NSS-PKCS#11] the Netscape Security Library calls C_Initialize on startup or when it loads a new module. The Netscape Security Library always passes NULL, as required by the PKCS #11 specification, in the single C_Initialize parameter pReserved. This function will use the IFD-function EstablishContext to initialize the IFD-module.
C_Finalize
As explained in [NSS-PKCS#11] the Netscape Security Library calls C_Finalize on shutdown and whenever it unloads a module.
This function will use the IFD-function ReleaseContext to initialize the IFD-module.
C_GetInfo
The Netscape Security Library calls C_GetInfo on startup or when it loads a new module. The version numbers, manufacturer IDs, and so on are displayed when the user views the information. The supplied library names are used as the default library names; currently, these names should not include any double quotation marks.
This function will only return static information and does not involve any IFD-function.
C_GetFunctionList
As explained in [NSS-PKCS#11] the Netscape Security Library calls C_GetFunctionList on startup or when it loads a new module. In [NSS-PKCS#11] it is recommended that for a not implemented function there should at least be a stub that returns CKR_FUNCTION_NOT_SUPPORTED.
This function will only return static information and does not involve any IFD-function.
C_GetSlotList
As explained in [NSS-PKCS#11] the Netscape Security Library calls C_GetSlotList on startup or when it loads a new module, requests all the module's slots, and keeps track of the list from that point on. The slots are expected to remain static: that is, the module never has more slots or fewer slots than the number on the original list. This means that the function C_WaitForSlotEvent is not used by the Netscape Security Library.
This function uses the following IFD-functions:
ListIFDsGetIFDCapabilitiesGetStatusC_GetSlotInfo
As explained in [NSS-PKCS#11] the Netscape Security Library calls C_GetSlotInfo on startup or when it loads a new module and reads in the information that can be viewed on the slot information page. If the CKF_REMOVABLE_DEVICE flag is set, the Netscape Security Library also calls C_GetSlotInfo whenever it looks up slots to make sure the token is present. If the CKF_REMOVABLE_DEVICE flag is not set, the Netscape Security Library uses that token information without checking again.
If the CKF_REMOVABLE_DEVICE flag is not set, the CKF_TOKEN_PRESENT flag must be set, or else the Netscape Security Library marks the slot as bad and will never use it.
The Netscape Security Library doesn't currently use the CKF_HW_SLOT flag.
For a particular slot this function returns the following structure:
typedef struct CK_SLOT_INFO {
    CK_UTF8CHAR slotDescription[64];
    CK_UTF8CHAR manufacturerID[32];
    CK_FLAGS flags;
    CK_VERSION hardwareVersion;
    CK_VERSION firmwareVersion;
} CK_SLOT_INFO;
CK_SLOT_INFO structure
C_GetTokenInfo
If a token is a permanent device (that is, if the CKF_REMOVABLE_DEVICE flag is not set), the Netscape Security Library calls C_GetTokenInfo only on startup or when it loads a new module. If the token is a removable device, the Netscape Security Library may call C_GetTokenInfo anytime it's looking for a new token to check whether the token is write protected, whether it can generate random numbers, and so on.
The Netscape Security Library expects CK_TOKEN_INFO label to contain the name of the token.
If the CKF_WRITE_PROTECTED flag is set, the Netscape Security Library won't use the token to generate keys.
The Netscape Security Library interprets the combination of the CKF_LOGIN_REQUIRED and CKF_USER_PIN_INITIALIZED flags as shown in the following table.
CFK_LOGIN_REQUIRED |
CFK_USER_PIN_INITIALIZED |
Netscape Security Library assumes that: |
|---|---|---|
FALSE |
FALSE |
This is a general access device. The Netscape Security Library will use it without prompting the user for a PIN. |
TRUE |
FALSE |
The device is uninitialized. The Netscape Security Library attempts to initialize the device only if it needs to generate a key or needs to set the user PIN. The Netscape Security Library calls C_InitPIN to initialize the device and set the user PIN; if these calls are successful, the key is generated and at that point the CFK_USER_PIN_INITIALIZED flag should change from FALSE to TRUE. |
FALSE |
TRUE |
This is a general access device that can have a PIN set on it. Because it's a general access device, the Netscape Security Library never prompts for the PIN, even though it's possible to set a PIN with C_SetPIN. If the PIN is set successfully, the CFK_LOGIN_REQUIRED flag should change to TRUE. The Netscape Security Library uses this combination of flags for its internal token when the key database password is NULL. These are not standard PKCS #11 semantics; they are intended for the Netscape Security Library's internal use only. |
TRUE |
TRUE |
The device has been initialized and requires authentication. The Netscape Security Library checks whether the user is logged on, and if not prompts the user for a PIN. |
Table 1: Interpretation of flags ([NSS-PKCS#11], Table 1.1)
For a typical signature card in operational mode the two flags are TRUE. On the other side the two flags for the private key on the eGK, which is used for card2card-authentication, are both FALSE.
This function returns the CK_TOKEN_INFO struct for a specific token.
typedef struct CK_TOKEN_INFO {
    CK_UTF8CHAR label[32];
    CK_UTF8CHAR manufacturerID[32];
    CK_UTF8CHAR model[16];
    CK_CHAR serialNumber[16];
    CK_FLAGS flags;
    CK_ULONG ulMaxSessionCount;
    CK_ULONG ulSessionCount;
    CK_ULONG ulMaxRwSessionCount;
    CK_ULONG ulRwSessionCount;
    CK_ULONG ulMaxPinLen;
    CK_ULONG ulMinPinLen;
    CK_ULONG ulTotalPublicMemory;
    CK_ULONG ulFreePublicMemory;
    CK_ULONG ulTotalPrivateMemory;
    CK_ULONG ulFreePrivateMemory;
    CK_VERSION hardwareVersion;
    CK_VERSION firmwareVersion;
    CK_CHAR utcTime[16];
} CK_TOKEN_INFO;
CK_TOKEN_INFO structure ([PKCS#11(v2.3)], p. 37)
C_GetMechanismList
As explained in [NSS-PKCS#11], the Netscape Security Library calls C_GetMechanismList fairly frequently to identify the mechanisms supported by a token.
This function returns the CK_MECHANISM_INFO struct for a specific token.
typedef struct CK_MECHANISM_INFO {
    CK_ULONG ulMinKeySize;
    CK_ULONG ulMaxKeySize;
    CK_FLAGS flags;
} CK_MECHANISM_INFO;
CK_MECHANISM_INFO structure ([PKCS#11(v2.3)], p. 49)
| Bit Flag | Mask | Meaning |
|---|---|---|
CKF_HW |
0x00000001 | True if the mechanism is performed by the device; false if the mechanism is performed in software |
CKF_ENCRYPT |
0x00000100 | True if the mechanism can be used with C_EncryptInit |
CKF_DECRYPT |
0x00000200 | True if the mechanism can be used with C_DecryptInit |
CKF_DIGEST |
0x00000400 | True if the mechanism can be used with C_DigestInit |
CKF_SIGN |
0x00000800 | True if the mechanism can be used with C_SignInit |
CKF_SIGN_RECOVER |
0x00001000 | True if the mechanism can be used with C_SignRecoverInit |
CKF_VERIFY |
0x00002000 | True if the mechanism can be used with C_VerifyInit |
CKF_VERIFY_RECOVER |
0x00004000 | True if the mechanism can be used with C_VerifyRecoverInit |
CKF_GENERATE |
0x00008000 | True if the mechanism can be used with C_GenerateKey |
CKF_GENERATE_KEY_PAIR |
0x00010000 | True if the mechanism can be used with C_GenerateKeyPair |
CKF_WRAP |
0x00020000 | True if the mechanism can be used with C_WrapKey |
CKF_UNWRAP |
0x00040000 | True if the mechanism can be used with C_UnwrapKey |
CKF_DERIVE |
0x00080000 | True if the mechanism can be used with C_DeriveKey |
CKF_EXTENSION |
0x80000000 | True if there is an extension to the flags; false if no extensions. Must be false for this version. |
Table 2: Mechanism Information Flags ([PKCS#11(v2.3)], p. 50)
C_OpenSession
As explained in [NSS-PKCS#11] the Netscape Security Library calls C_OpenSession whenever it initializes a token and keeps the session open as long as possible. The Netscape Security Library almost never closes a session after it finishes doing something with a token. It uses a single session for all single-part RSA operations such as logging in, logging out, signing, verifying, generating keys, wrapping keys, and so on.
The Netscape Security Library opens a separate session for each part of a multipart encryption (bulk encryption). If it runs out of sessions, it uses the initial session for saves and restores.
This function will use the IFD-function Connect to open a session to the token.
C_CloseSession
As explained in [NSS-PKCS#11] the Netscape Security Library calls C_CloseSession to close sessions created for bulk encryption.
This function will use the IFD-function Disconnect to close a session to the token.
C_CloseAllSessions
As explained in [NSS-PKCS#11] the Netscape Security Library may call C_CloseAllSessions when it closes down a slot.
C_GetSessionInfo
The Netscape Security Library calls C_GetSessionInfo frequently.
If a token has been removed during a session, C_GetSessionInfo should return either CKR_SESSION_CLOSED or CKR_SESSION_HANDLE_INVALID. If a token has been removed and then the same or another token is inserted, C_GetSessionInfo should return CKR_SESSION_HANDLE_INVALID.
C_Login
The Netscape Security Library calls C_Login on a token's initial session whenever CKF_LOGIN_REQUIRED is TRUE and the user state indicates that the user isn't logged in.
This function will use the IFD-function VerifyUser to perform the authentication of a user.
C_Logout
The Netscape Security Library calls C_Logout on a token's initial session
In the scope of a TLS-handshake the client needs to read the certificate from the card and send it to the server. This functionality is most likely performed using the following two functions.
C_GetAttributeValue
The Netscape Security Library calls C_GetAttributeValue to get the value of attributes for both single objects and multiple objects. This is useful for extracting public keys, nonsecret bulk keys, and so on.
C_FindObjectsInit, C_FindObjects, C_FindFinal
The Netscape Security Library calls these functions frequently to look up objects by CKA_ID or CKA_LABEL. These values must match the equivalent values for related keys and certificates and must be unique among key pairs on a given token.
The Netscape Security Library also looks up certificates by CK_ISSUER and CK_SERIAL. If those fields aren't set on the token, S/MIME won't work.
In the scope of a TLS-handshake the client needs to sign data, which is constructed based on previously exchanged messages in the handshake. This signature is most likely created using the functions C_SignInit, C_Sign and C_SignFinal.
[Grif09] R. Griffin: Encryption and Key Management Tutorials, Part II: PKCS #11 – Enhancements and Opportunities, Talk at RSA 2009, ftp://ftp.rsasecurity.com/pub/pkcs/pkcs-11/v2-30/TUT-M51_Griffin_PKCS11.pdf
[NSS-PKCS#11] Implementing PKCS #11 for the Netscape Security Library, http://docs.oracle.com/cd/E19957-01/816-6150-10/pkcs.htm
[PKCS#11(v2.3)] RSA Laboratories: PKCS #11 Base Functionality v2.30: Cryptoki – Draft 4, 10 July 2009
PKCS11 FAQ
https://developer.mozilla.org/en-US/docs/PKCS11_FAQ
Using the PKCS #11 Module Logger
NSS Technical Note: 2
http://www.mozilla.org/projects/security/pki/nss/tech-notes/tn2.html
Network Security Services (NSS)
(The main NSS page with lots of links to current material)
http://www.mozilla.org/projects/security/pki/nss/
PKCS#11
https://dev.openecard.org/issues/128
Chromium support for PKCS #11
https://dev.openecard.org/issues/163
Open eCard PKCS#11 IPC Design
https://dev.openecard.org/attachments/download/237/pkcs11.pptx
The following modules are derived from the high level project structure. Information about the architecture, data structures and other things can be found in the respective links.
Contains the implementation of the Add-on Framework. This includes the mapping of the abstract XML description into Java data structure, interface specifications and classes for the management of the add-ons.
Here you'll find all CardInfo files of the eID client which are used to recognize cards. Furthermore there are images of the specific card and a static recognition tree which is executed when a new card is inserted.
The Card Recognition module uses the abstract XML descriptions of the CardInfo module to provide functionality to the system.
Contains sub modules which implement a client for a specific platform. Currently there are the following two client available:
Contains the code for the Rich client application based on the Swing implementation of the GUI. The main target of this client version are desktop pcs and laptop.
A client version for the Android operating system which is primary located on smart phones and tablet pcs.
The Open eCard App requires currently Java 7 if it is available this little tool will warn the user.
This package contains all available Binding implementations which are listed below.
Contains the implementation of the HTTP Binding which is used to offer HTTP Services to the external world.
This module contains the Bouncy Castle code.
Contains common cryptography classes for e.g. ASN1 objects used in the EAC process. Furthermore there are utility classes for easier access to DID's and their features.
Contains TLS client implementations used to communicate with remote parties. The clients are implemented according to the guideline that are related to TLS cryptography.
The Event Manager module is
Swing implementation of the About dialog.
Graphic utilities to retrieve the Open eCard logo in different sizes and different backgrounds.
Provides the abstract definition of the GUI elements which are implemented by the specific platforms. Their are also executors for GUI steps.
Contains the Swing implementation of the abstract GUI definitions of the GUI common package.
Contains the Android specific GUI.
Contains common interfaces and classes for an IFD implementation.
Implementation of the PACE protocol as IFD protocol.
SmartcardIO stuff specific for OS X
This sub module contains the implementations of the interfaces specified in IFD common for PC/SC.
Contains an implementation of the interfaces specified in the IFD common module which is able to interact with the NFC interface of modern smart phones.
Provides the general functionality of the IFD.
Currently this contains the code for a PIN Management which is only capable to handle the German eID card.
Implementation of the Genric Cryptography Protocol according to BSI-TR03112-7 (Not complete)
Provides the classes for a TCToken based activation of the eID client. This mechanism supports the German eID card and cards used for an TLS authentication.
Implementation of an Add-on which provides status information about the eID client.
Provides several classes for the handling of APDUs for smart cards. It is easier to use them instead of using the plain hex codes. Furthermore there are utility classes for different purposes.
Module containing the translations of the Open eCard App.
Contains ab Open eCard implementation of a Marshaller
Contains web service definitions (.xsd, .wsdl).
Provides some utility classes and exception definitions.
Implementation of the Service access layer providing functions according to BSI-TR03112 part 4 and 7.
Implementation of the Dispatcher which is responsible for the message passing between the components.
The main aspects of the quality management within the Open eCard project are explained in [NHHW15].
The quality management consist of two big parts. The first part is covered by the Developer Guide, which contains the rules regarding to the code quality, code style, etc. The second part is a description of test which ensure have to be completed before a new version of the Open eCard App is released.
[ISO 9000:2015] defines quality assurance as a "part of quality management [...] focused on providing confidence that quality requirements will be fulfilled." In this sense quality assurance is a process targeting the objective to guarantee that a product works as intended. This task is mostly done by specifying tests which may be automated or not. The Open eCard project uses a mixture of manual and automated tests in the form of Continuous Integration and acceptance tests where automation is not feasible.
The Open eCard team uses Jenkins as tool for this task. The Jenkins server builds the complete project after a new version has been uploaded to the main Git repository after that all unit and integration tests available and enabled are performed. If an error occurs while this procedure the responsible release manager and if contact information are available the developers are informed. In the case that are all test successfully executed the release manger has to decide whether to accept or reject the changes.
The main focus of the acceptance testing is the compliance to the technical guideline BSI TR-03124 part 2 and the practical usability with
existing services, which accept the supported cards.
The policy for performing acceptance tests is as follows:
The git master repository is available under the following ssh URL:
https://github.com/ecsec/open-ecard.git
Every user with git development access has his own repository which is accessible under the following URL:
git@vserver-001.urospace.de:ecard-client/firstname_lastname
To get access to your personal repository, you first have to add it to your remotes. This is accomplished by the following command:
git remote add local-name-for-repo git@vserver-001.urospace.de:ecard-client/firstname_lastname
For example, if John Doe wants to add his personal repository to his remotes, he has to execute the following command:
git remote add jd git@vserver-001.urospace.de:ecard-client/john_doe
The same command can be used to add repositories of other developers.
Commit messages and the appropriate level of granularity is the essence of a readable and comprehensible history. Progit sec. 5.2 recommends that commits are revised with git commit -p or git add -i , before being committed.
If however it becomes apparent that the structure of the commits, or its log messages are badly done, a rewrite of the history with git rebase -i can be used. There are other rewrite tools (magit) which help with the task at hand. http://alexvollmer.com/posts/2009/01/31/rewriting-history-with-git/ has a nice write-up how to rewrite history with the bundled git commands.
Concerning the commit message, there are a lot of descriptions on the web. Most of them are quite similar. One of the more comprehensive descriptions can be found in Progit sec. 5.2 in paragraph Commit Guidelines.
A good commit message begins with a header line which is, according to Progit, 50 characters long. I tend to extend this length to ca. 70 characters. We don't live in times where consoles only have 78 character anymore. The header line should contain a brief summary of the changes in the commit. Issue references should go into the body, because nobody knows what is behind them when looking at the log. An exception to this rule is, when the summary is sufficient to describe the change and no body is needed. The summary must use imperative present tense, meaning 'Add X' instead of 'Added X'. The summary ends without a full stop.
If a body is needed, a blank line followed by the body is inserted after the header line. These items are optional, but it is good practise to add them. The line width of the body should be about 100 characters. The body should contain details and perhaps a motivation for the patch. Especially when adding changes in complicated code, think of cryptography for example, the reader may not understand the change without this explanation. The body may consist of several paragraphs which are separated by blank lines.
Enumerations or bullet points can be used inside the body. They should be indented by one space and their text should be aligned by the first character of the items text. Bullet points should be written with -.
Short (up to 70 chars) summary of changes

More detailed explanatory text, if necessary. Wrap it to about 100 characters or so. In some
contexts, the first line is treated as the subject of an email and the rest of the text as the body.
The blank line separating the summary from the body is critical (unless you omit the body entirely);
tools like rebase can get confused if you run the two together.

Further paragraphs come after blank lines. Enumerations and bullet points look like this:
 - Bullet points are okay, too
 - Typically a hyphen or asterisk is used for the bullet, preceded by a single space, with blank
   lines in between, but conventions vary here
or
 1. Point one
 2. Another point
Following the abstract user interface is depicted. As implementation example we use the EAC protocol which is described in more detail in http://dev.openecard.org/attachments/download/350/ISO24727%20EAC.ppt and the implementation of the protocol is available at https://github.com/ecsec/open-ecard/tree/stage/addons/tr03112. The usage of the GUI parts which are required by the protocol are in a separate package https://github.com/ecsec/open-ecard/tree/stage/addons/tr03112/src/main/java/org/openecard/sal/protocol/eac/gui there you'll find a complex example of the usage of the abstract GUI. So how is the GUI called? The GUI is part of an SAL protocol and is called if the related SAL action is invoked, in this case this is the method public DIDAuthenticateResponse perform(DIDAuthenticate request, Map<String, Object> internalData) in class PACEStep. See https://github.com/ecsec/open-ecard/blob/stage/addons/tr03112/src/main/java/org/openecard/sal/protocol/eac/PACEStep.java. More information about SAL protocols are available on the Add-on System page.
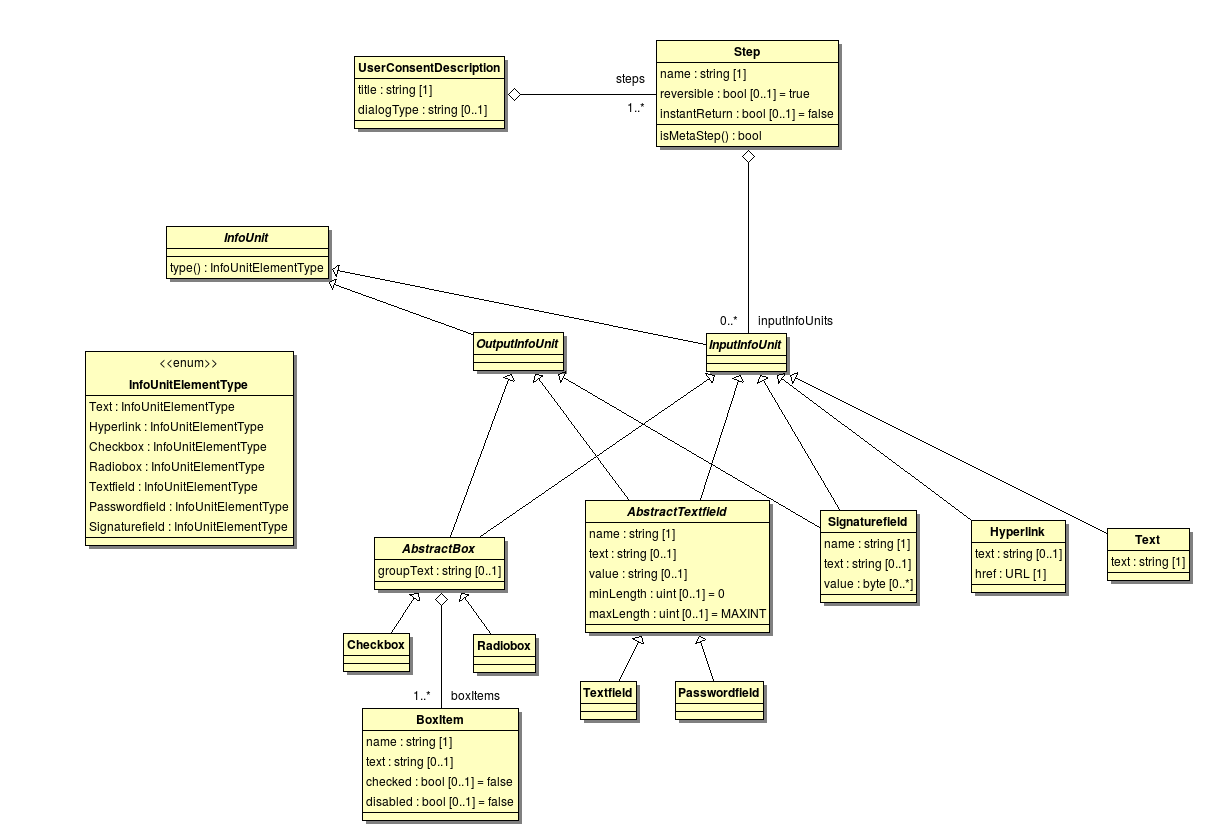
¶The main goal of the Open eCard project is the implementation of an eID client which implements the eCard API Framework according to BSI-TR03112 which is also conformant to the technical guideline BSI-TR03124 which covers the requirements for eID clients capable to use the German electronic identity card. While the second point is implemented completely the first one is not yet finished which is part of later development processes.
Next to completing the Framework implementation there has to be done some optimization work and also some refactoring has to be done to simplify the internal structure and processes. Furthermore the support for additional cards is an target to increase the number of potential users. Also the development of Add-ons for specific usages are on the agenda like an signature add-on to create digital signature for PDF documents, XML documents, ...
The team of the Open eCard Project consists of experts out of the academic and industrial sector. A list of members working or have been working on the project is stated below.
Tests are an important part of the development work to ensure the functionality of the code. This wiki page covers the guideline regarding unit tests and states difficulties to define integration tests for new devices.
Unit tests are used to test the correct behavior of functions. The Open eCard project uses for test creation the TestNG Framework which is inspired by JUnit and NUnit but provides new functionalities and is easier to use.
Test files have to be placed into the separate source tree src/test relative to the root directory of the project or module. The Java files should be placed into src/test/java while supporting files like images, XML files or whatever the test requires has to be located in src/test/resources. Most Java IDEs have integrated support for this structure and create it automatically but if you just use a editor without project support you should know this. In the java directory the same package structure as in the source tree should be applied.
There is no strict rule which methods have to be tested. Here we give a brief overview of thing which should be tested and which not.
@Test(expectedExceptions=...) is legit in case of a test with wrong data.Here we provide a short introduction into the creation of unit tests with TestNG. For detailed information visit the TestNG Documntation.
Specifying a test works the following way:
package de.foo.bar

import org.testng.annotations.Test;

public class foo {

    @Test
    public void foobarTest() {

    }
}
So all you have to do is to annotate a public method with the @Test annotation which instructs the TestNG Framework to interpret the function as test. But currently the test is always evaluated to passed because no real rest method is called. So lets add some more detail to the test.
package de.foo.bar

import org.testng.annotations.Test;
import org.testng.Assert;

public class foo {

    @Test
    public void foobarTest() {
        BarObject bar = new BarObject();
        bar.open(true);
        Assert.assertNotNull(bar);
        Assert.assertTrue(bar.isOpen());
    }
}
The test creates now a BarObject and sets the bar to open. Now the assertNotNull() method checks that the bar is not NULL that's obviously true. Furthermore a check is performed which test whether the bar is open and the bar is so the conditions is also true and the test is passed. If a condition in an Assert statement is not fulfilled the test is evaluated to failed.
Another feature of TestNG is to evaluate methods which throw exception in certain cases.
package de.foo.bar

import org.testng.annotations.Test;

public class foo {

    public static class Beer {

        public boolean open(int power) throws BottleBrokenExcepion {

            if (power > 75) {
                throw new BottleBrokenException();
            } else if (power < 25) {
                return false;
            } else {
                return true;
            }
        }

    }

    @Test(expectedExceptions = BottleBrokenException.class)
    public void beerTest() {
        Beer beer = new Beer();
        bee.open(80);
    }
}
In some case it might be necessary to create an object with a lot of methods if we would do that in the test method the method body would grow and grow. TestNG provides an annotation for methods to do such things before the test is launched.
package de.foo.bar

import org.testng.annotations.Test;
import org.testng.Assert;

public class foo {

    private Cocktail cocktail;

    @BeforeClass
    public void init() {
        cocktail.add(new Limejuice());
        cocktail.add(new Vodka());
        cocktail.add(new Beer());
        cocktail.add(new Wine());
        cocktail.shake();
    }

    @Test
    public void cocktailTest() {
        Assert.assertFalse(cocktail.tastsGood());
    }
}
Note: There are several other @Before* annotations available see the TestNG documentation for the exact meaning.
This diagram shows the TLS classes as available in the BouncyCastle library.
The TlsCredentials and TlsSignerCredentials interface are located in the upper left of the diagram. These interfaces are used in a TLS client authentication to get the client certificate and to produce a signature. For the use of software certificates, BouncyCastle comes with the implementation DefaultTlsSignerCredentials.
The common entry point for TLS based communication is the TlsClient interface in the lower left. In the current BC version, it has three abstract implementations (DefaultTlsClient PSKTlsClient SRPTlsClient) which are missing the getAuthentication() function.
The class returned by this function has two responsibilities. The fist is the validation of the server certificate and the second is the selection of a client credential depending on the supplied CAs. The CAs can be extracted from the CertificateRequest (see upper right) parameter in getClientCredentials().
The last relevant class in this diagram is the TlsProtocolHandler. Given a bidirectional stream (usually based on a socket) and a TlsClient, a new bidirectional stream can be extracted which wraps the original stream in a TLS channel. This handler implements the general TLS protocol and triggers the certificate validation and client authentication.
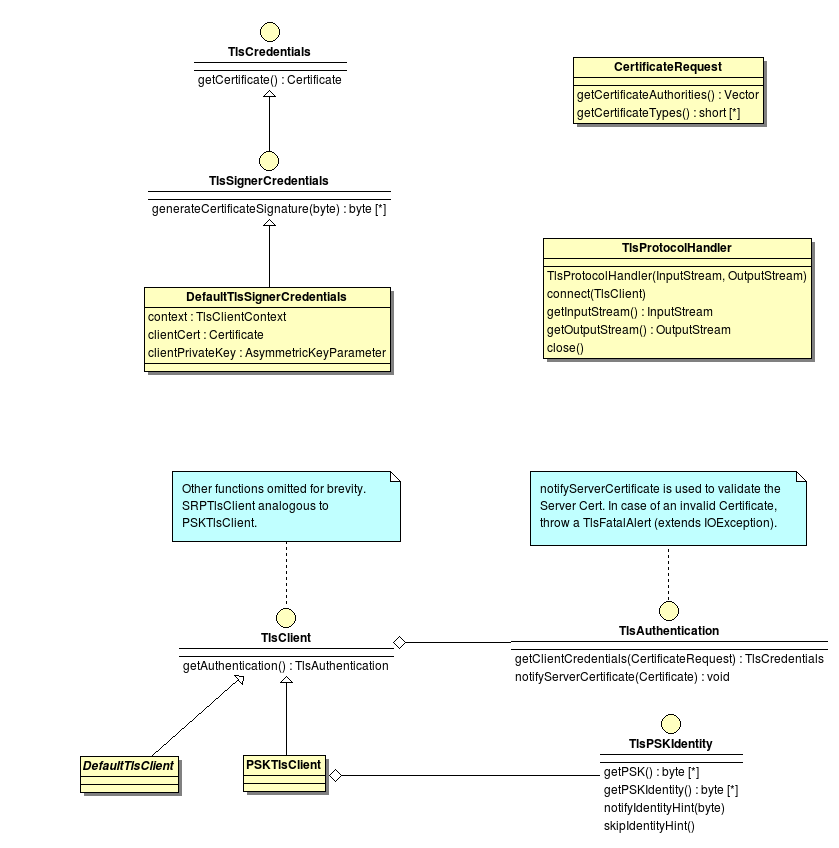
This diagram shows classes that make use of the BouncyCastle classes in order to select and use custom credentials for the TLS authentication.
The TlsClient interface introduced in BouncyCastle Classes is extended with a setAuthentication() function and called ClientCertTlsClient. Each client implementing this new interface can be configured at runtime to use a different server certificate validation and to support client authentication. The implementations are derived from the ones in BouncyCastle, so no functions other than getAuthentication and setAuthentication must be implemented.
The TlsAuthentication interface has no implementation in BouncyCastle. With the new capability to compose the TlsClient at runtime, it also makes sense to compose the TlsAuthentication this way.TlsNoAuthentication implements the certificate verification part, but raises an error, when client authentication is requested. Based on this implementation, the TlsAuthenticationSelector creates the appropriate TlsSignerCredentials for the requested CAs and given restrictions (ConnectionHandle) by the activation (see diagram in Credential Selection.
The credential is either selected from a software certificate keystore (SoftKeyStore) or by inspecting the SALs token. In the latter case, a SALSignerCredentials instance is created and memorized in the selector if further TLS channels must be opened.
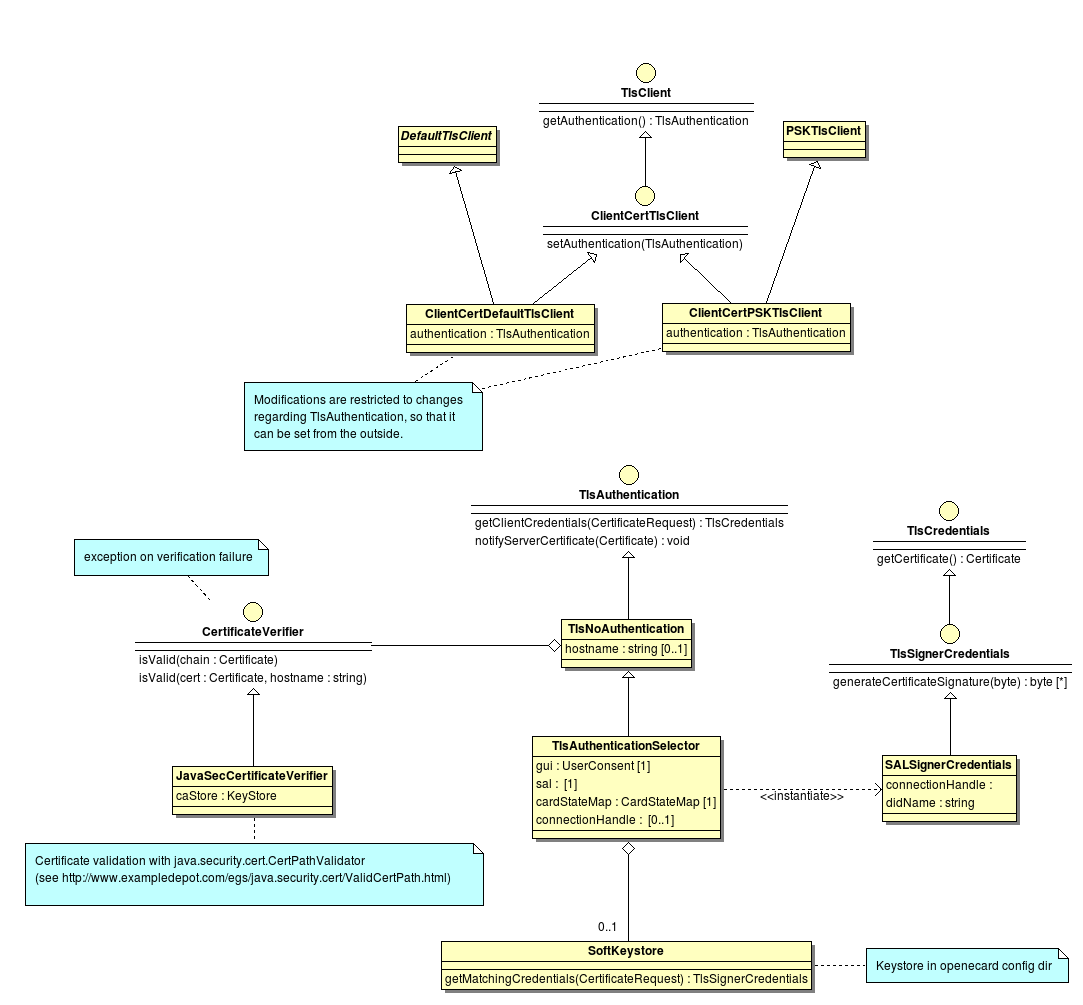
This diagram shows classes of and extensions to Apache http-core. This library is needed in order to isolate TLS channels from each other. Connection sharing must be explicitly controlled for high security requirements.
The TlsProtocolHandler from BouncyCastle emits streams rather than sockets as usually used in the implementations of HttpClientConnection. The AbstractHttpClientConnection uses SessionInputBuffer and SessionOutputBuffer internally to encapsulate the socket. A stream based implementation is needed as shown by the classes StreamSessionInputBuffer and StreamSessionOutputBuffer.
DefaultConnectionReuseStrategy is used to determine whether a connection (streams) can be reused after a request-response pair is processed by the HttpClientConnection.
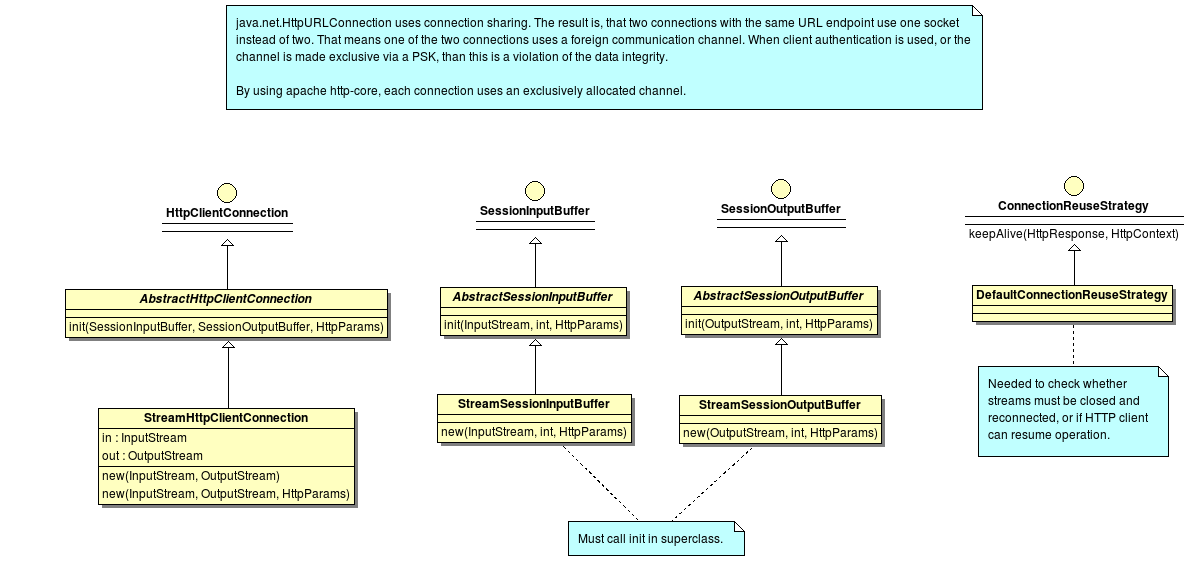
The two following diagrams show how the a TLS channel is established and reused in a HTTPS context.
The following diagram explains how the BouncyCastle classes and the extensions from the Open eCard App can be used to establish a secured connection.
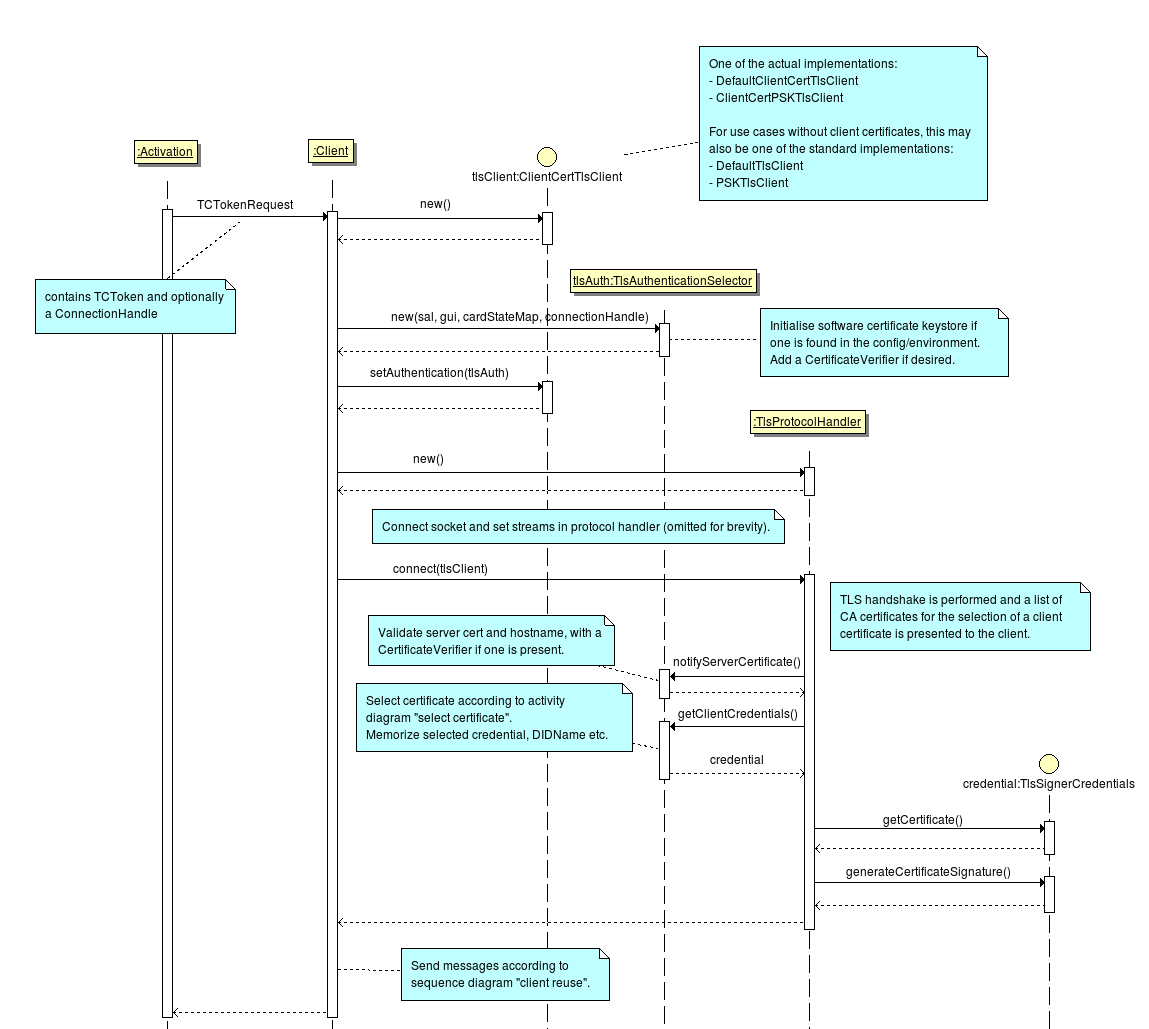
The following diagram shows the process of opening a HTTPS connection, sending and receiving data and finally determining whether the streams of the secure channel can be reused or not.
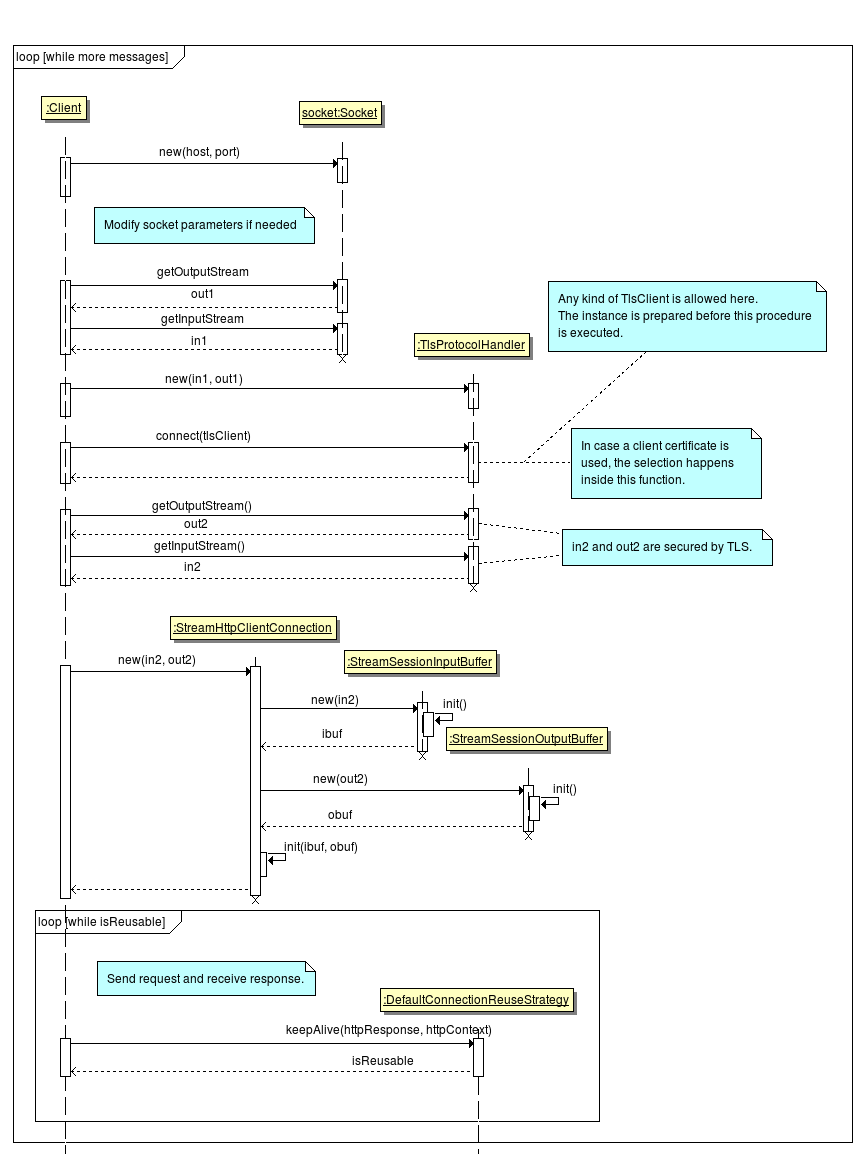
The following two activity charts show the process how a credential is selected for the authentication.
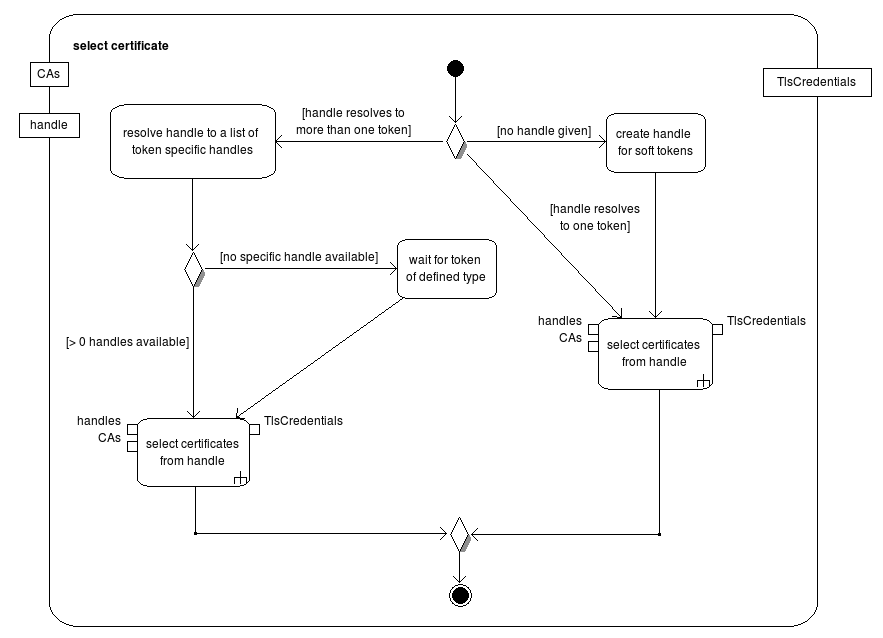
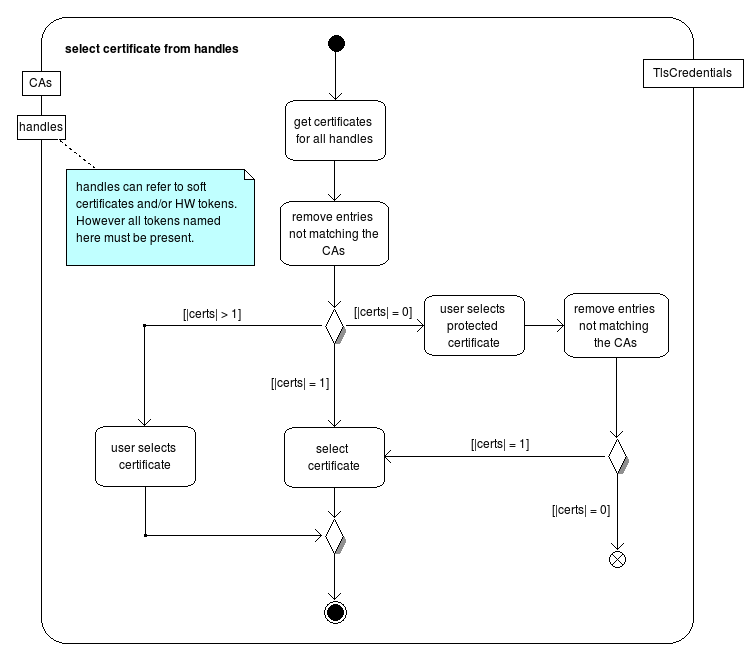
The Richclient is a Java SE application intended to run as a desktop application. It is usually installed on a machine in an operating system specific manner and executed by the user on his own behalf.
openjdk-6-jre and icedtea6-plugin, while Wheezy users should install openjdk-7-jre and icedtea-7-plugin.Each client implementation of the Open eCard App uses a common base set of configuration options and possibly additional client specific settings. The clients provide their own configuration dialogs that are appropriate for the platform or operating system they are running on.
In the rest of this section the settings common to all client implementations are defined and explained. The sections afterwards describe the client specific settings as well as the UIs that provide a more user friendly way to modify these settings.
The Open eCard App loads and saves all its settings to a Java style property file. This file is user specific and can be found under the path $HOME/.openecard/openecard.properties. Besides this config file, the .openecard directory may contain other client or plugin specific files, like log settings or log files.
The Open eCard App is able to support either SOCKS or HTTP proxies, which are configured using the following properties:
SOCKS:
proxy.socks.host = localhost -- Hostname or IP address of the server where the proxy server is running on.
proxy.socks.port = 8080 -- Port on the proxy host where the proxy service is listening on.

HTTP(S):
proxy.http.scheme = http -- specifies the protocol scheme of the proxy (http or https)
proxy.http.host = localhost -- Hostname or IP address of the server where the proxy server is running on.
proxy.http.port = 8123 -- Port on the proxy host where the proxy service is listening on.
proxy.http.user = foo -- User name for basic authentication (optional).
proxy.http.pass = bar -- Password for basic authentication (optional).
proxy.http.validate_tls = false -- specifies that the certificate of the proxy service is not validated against the java key store (optional)
Each client may use a different logging framework. In the applet, Java Util Logging is used to save space of the executable while in the richclient, Logback provides a feature rich logging framework. Both are configured differently.
The logging configuration can be modified by a config file in the directory $HOME/.openecard (%HOME/.openecard for Microsoft Windows systems). The file must be named applet_log.properties for the applet and richclient_logback.xml for the richclient. Samples can be found at the end of this page.
After adding the config file, the log granularity of the packages and/ or classes must be configured. The syntax and possibilities of each logging framework are different from each other. The samples include an exemplary line for a package. For further details consult the documentation of the logging framework in use.
The following is a list of important packages to find errors. A complete list is available in the JavaDoc.org.openecard.transport.paosorg.openecard.ifd.scioorg.openecard.salorg.openecard.sal.protocol.eacWithin the scope of the Open eCard Project academic and industrial experts team up with the goal to provide an open source and platform independent implementation of the eCard-API-Framework BSI-TR-03112. This enables any application to easily access a smart card for an authentication or signature creation.
If you want to discover more information about the Open eCard team and the project goals click here.
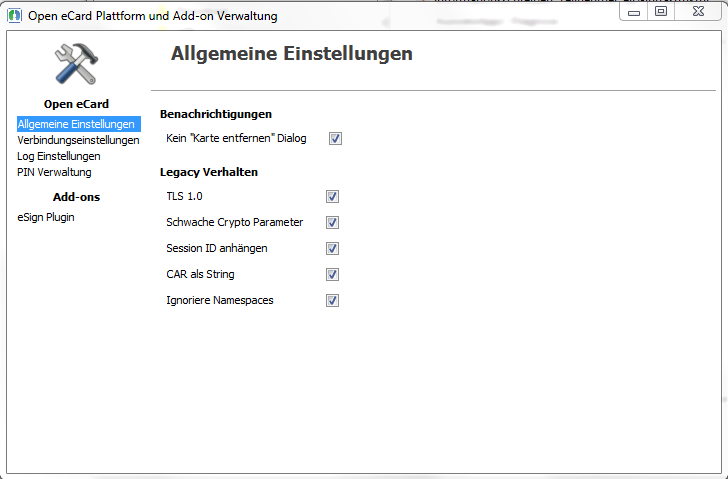
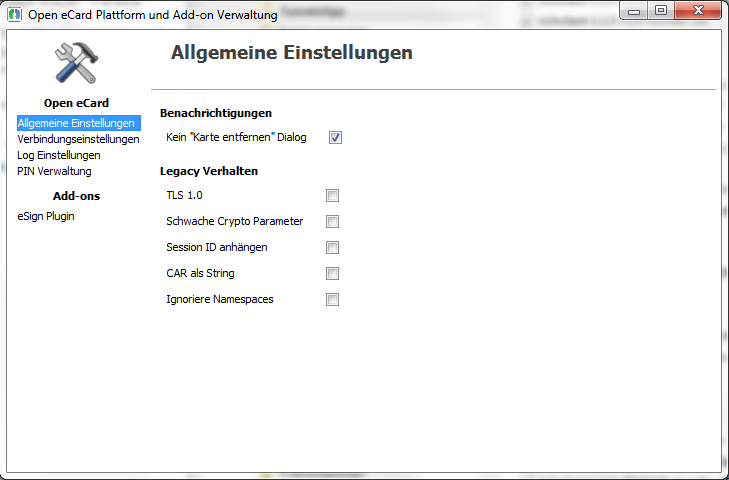